Exchange Servers use SSL certificates to encrypt connections between the client and servers. Whether using Outlook Desktop or on the web, the SSL certificate provides a way to protect client-server communication from prying eyes.
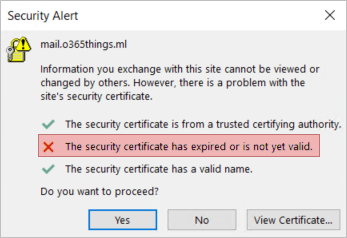
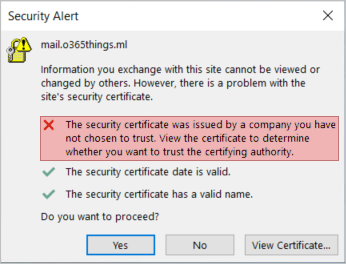
But SSL certificates have an expiration date. If the certificate expires without you noticing, users will see a pop-up message when starting Outlook, similar to the one below.
You must renew the Exchange certificate to fix the error when this happens. The procedure will vary and depends on whether the SSL certificate is self-signed or issued by a certification authority. In this tutorial, we’ll learn how to do both.
Note. Starting from Exchange Server 2019 CU12 and Exchange Server 2016 CU23, renewing an Exchange Server certificate from the GUI (Exchange Admin Center) is no longer available. You can only renew certificates using PowerShell.
Table of Contents
Renew a Self-Signed Exchange Certificate
If your Exchange Server uses a self-signed certificate, you can quickly renew it. The renewal process basically means that you’re creating a new certificate based on the old one.
Using the Exchange Admin Center
Reminder. This procedure works only with versions before Exchange Server 2019 CU12 and Exchange Server 2016 CU23. If your Exchange Server version is newer, you can only renew the certificate in PowerShell.
Follow these instructions to renew a self-signed Exchange Server certificate using the EAC.
- Log in to your Exchange Admin Center at https://your_exch_srv_fqdn/ecp/.
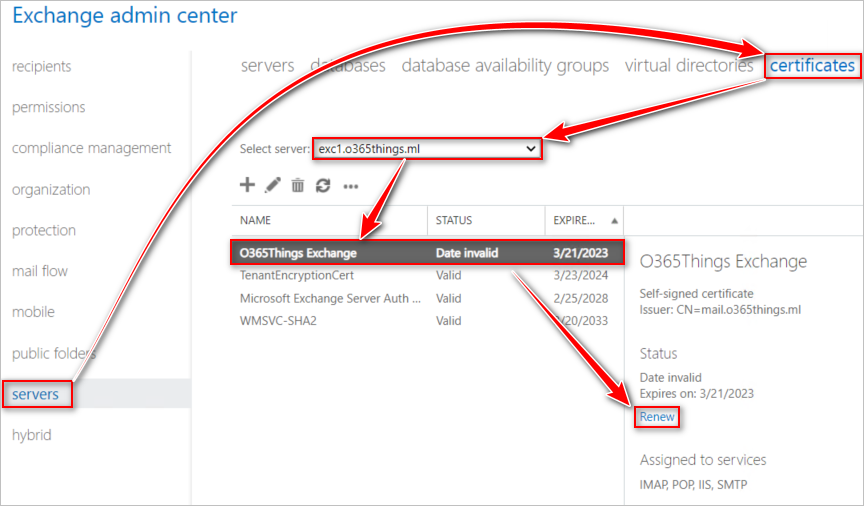
- Navigate to server > certificates.
- Select the server from the dropdown list, select the certificate you wish to renew, and click the Renew link on the right:
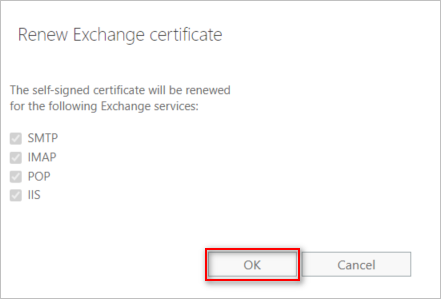
- On the Renew Exchange certificate pop-up window, click OK.
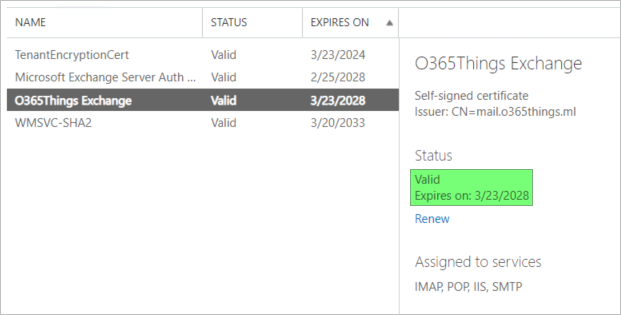
The certificate will be renewed, and the old one will be removed. As you can see below, the certificate is now valid.
Using PowerShell
To renew the self-signed Exchange certificate via PowerShell, proceed as follows.
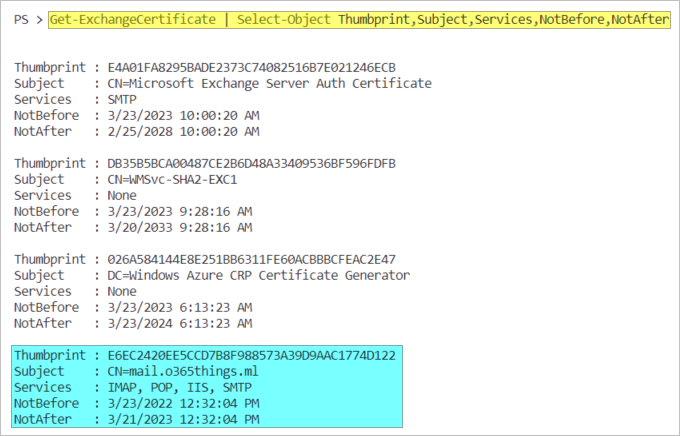
- Open the Exchange Management Shell and run this command to list the current Exchange certificates:
Get-ExchangeCertificate | Select-Object Thumbprint,Subject,Services,NotBefore,NotAfter
- Look for the certificate to renew and copy its thumbprint value.
- Now, let’s renew the certificate. This command gets the certificate object with the E6EC2420EE5CCD7B8F988573A39D9AAC1774D122 thumbprint and creates a new certificate based on its details.
Get-ExchangeCertificate -Thumbprint E6EC2420EE5CCD7B8F988573A39D9AAC1774D122 | `

New-ExchangeCertificate -Force -PrivateKeyExportable $true
The new certificate has been created.
- Copy the new certificate’s thumbprint and run the below command to assign all services to use it:
# Assign Services.

Enable-ExchangeCertificate `

-Thumbprint C37E73C7E1C6878A6D21F59A1707847D7F2D97AF `

-Services IIS, IMAP, POP, SMTP

# Confirm the new certificate details.

Get-ExchangeCertificate `

-Thumbprint C37E73C7E1C6878A6D21F59A1707847D7F2D97AF | `

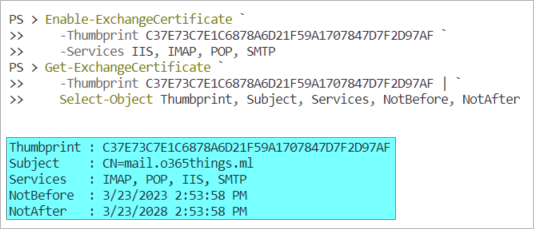
Select-Object Thumbprint, Subject, Services, NotBefore, NotAfter
The result below shows that the renewed certificate has been installed, and the services have been assigned.
Post-Renewal Tasks
Since renewing a self-signed Exchange certificate is essentially creating a new one, the server, and other clients do not trust this new certificate.
To get rid of this certificate error and ensure the devices trust this certificate, you must copy the certificate from the Personal store to the Trusted Root Certification Authority store.
Of course, you shouldn’t do this manually on all Windows devices. Perhaps you can deploy these certificates via group policy or logon scripts. The same goes for non-Windows devices, but that’s not covered in this tutorial.
Renew a CA-Issued Exchange Certificate
In larger organizations, or when the Exchange Server is published externally, it is common to see certificates issued by a certification authority rather than self-signed. Renewing this type of certificate is more nuanced since another party is involved in issuing the certificate.
Below are the high-level steps in this Exchange certificate renewal scenario:
- The admin generates the certificate signing request (CSR).
- The submits the request to the issuer,
- The issuer accepts the request and generates the new Exchange SSL certificate.
- The issue sends the renewed certificate to the admin.
- The admin installs the new Exchange certificate.
We’ll perform this task in the following sections via the Exchange Admin Center and PowerShell.
Using the Exchange Admin Center
Reminder. This procedure works only with versions before Exchange Server 2019 CU12 and Exchange Server 2016 CU23. If your Exchange Server version is newer, you can only renew the certificate in PowerShell.
- Log in to your Exchange Admin Center at https://your_exch_srv_fqdn/ecp/.
- Navigate to server > certificates.
- Select the server from the dropdown list, select the certificate you wish to renew, and click the Renew link on the right.
In the below screenshot, you can see that the certificate will expire in two days.
- Enter the UNC path to save the certificate request file on the pop-up window. Make sure that this UNC path exists and is accessible. Click OK.
- Now, locate the certificate request file you generated and submit it to your certificate issuer. The issuer could be an internal CA or a third-party CA like DigiCert, GoDaddy, etc.
- Assuming that the CA has issued the new certificate, most likely in *.cer format, copy it to the UNC path.
- Back on the EAC, click Complete.
- On the next window, enter the UNC path of the new certificate and click OK.
- The certificate status has now changed to Valid, meaning the renewal was successful. But as you can see below, the SMTP and IIS services were not automatically assigned to the new certificate. To assign service, click the Edit button.
- Navigate to services, check the SMTP and IIS boxes, and click Save.
- When you get a warning about overwriting the existing certificate assignment, click Yes.
The Exchange services are now assigned to the new certificate.
Using PowerShell
Follow these steps to renew a certificate issued by a certificate authority using PowerShell.
- Open the Exchange Management Shell and run this command to list all Exchange certificates:
Get-ExchangeCertificate | Select-Object Thumbprint,Subject,Services,NotBefore,NotAfter
- Find the expiring or expired certificate that you plan to renew. Copy its thumbprint for the next step.
- Now that you’ve determined the certificate thumbprint to renew, run the below commands:
## Create a Base64 encoded certificate request

$certRequest = Get-ExchangeCertificate `

-Thumbprint 76B73B456B9ECF746D282F271ED6AA8DABCFD37C | `

New-ExchangeCertificate -GenerateRequest

## Save the CSR to a file

[System.IO.File]::WriteAllBytes('\\exc1.o365things.ml\c$\certreq\certificate_renewal.req', `

[System.Text.Encoding]::Unicode.GetBytes($certRequest))
The first command retrieves the existing certificate with thumbprint 76B73B456B9ECF746D282F271ED6AA8DABCFD37C and uses its details to create a request. The second command exports the request to a file in the UNC path \\exc1.o365things.ml\c$\certreq\certificate_renewal.req.
- Submit the resulting certificate request to your CA.
- Once you receive the new certificate from the issuer, copy it to the UNC path of your choice. In this example, let’s put it in the same UNC path as the certificate request file.
- Back in PowerShell, run this command to complete the certificate renewal. This example imports the \\exc1.o365things.ml\c$\certreq\certnew.cer certificate that doesn’t require a password. Also, the certificate’s private key will be exportable as defined by the -PrivateKeyExportable $true parameter.
Import-ExchangeCertificate -FileData `

([System.IO.File]::ReadAllBytes('\\exc1.o365things.ml\c$\certreq\certnew.cer')) `

-PrivateKeyExportable $true
The Exchange certificate has been imported. Copy the new certificate’s thumbprint.
- Run the below command to assign the IIS, SMTP, POP, and IMAP services to the certificate. Make sure to replace the thumbprint value before running the command.
Enable-ExchangeCertificate `

-Thumbprint 1870728CA24594EC2378675EF4819AAD0F7FC7D1 `

-Services IIS, IMAP, POP, SMTP `

-Force
- Finally, confirm that the new certificate is valid and has all the Exchange services assigned.
Get-ExchangeCertificate `

-Thumbprint 1870728CA24594EC2378675EF4819AAD0F7FC7D1 | `

Select-Object Thumbprint, Subject, Services, NotBefore, NotAfter
That’s it! You’ve renewed the Exchange server certificate.
- In OWA or ECP, the new certificate will be used by Exchange to encrypt the connection.
Conclusion
Renewing an expired or expiring Exchange server certificate can be daunting, especially for first-timers. This maintenance task is critical to keep users’ devices connected without errors and secure.
Whether your Exchange server uses a self-signed certificate or is issued by a certificate authority, the renewal process is similar. Proper planning and careful execution will go a long way in ensuring the certificate renewal goes without a hitch.




 The Exchange services are now assigned to the new certificate.


2 comments
Hi Cyril,
Thank you for the detailed step by step instructions, much appreciated, a friendly question, what is the method I can use to renew a certificate in a DAG environment, how do I generate a request, give it Digicert and how do I import it into my DAG 4 server environment, please help. Sorry if I am looking for another guide, thank you.
Make sure to include -PrivateKeyExportable in the New-ExchangeCertificate
otherwise the certificate wont be exportable.