Sending messages from Exchange shared mailboxes is standard for businesses. Users may experience email delivery failure when sending messages as another mailbox with the following non-delivery report (NDR) examples.
This message could not be sent. Try sending the message again later, or contact your network administrator. Error is [0x80070005-00000000-00000000].
This message could not be sent. You do not have the permission to send the message on behalf of the specified user. Error is [0x80070005-00000000-00000000].
So what do you do when this happens? Here are a few troubleshooting recommendations and solutions to try.
Table of Contents
Possible Cause: Broken Offline Address Book
When Outlook is set up in cached mode, the local address book copy can become corrupted for various reasons. And when that happens, it can also affect your Outlook’s ability to send messages from another mailbox.
Note. Check out how to share Outlook contacts folder in Office 365.
Solution 1: Force an update of the offline address book
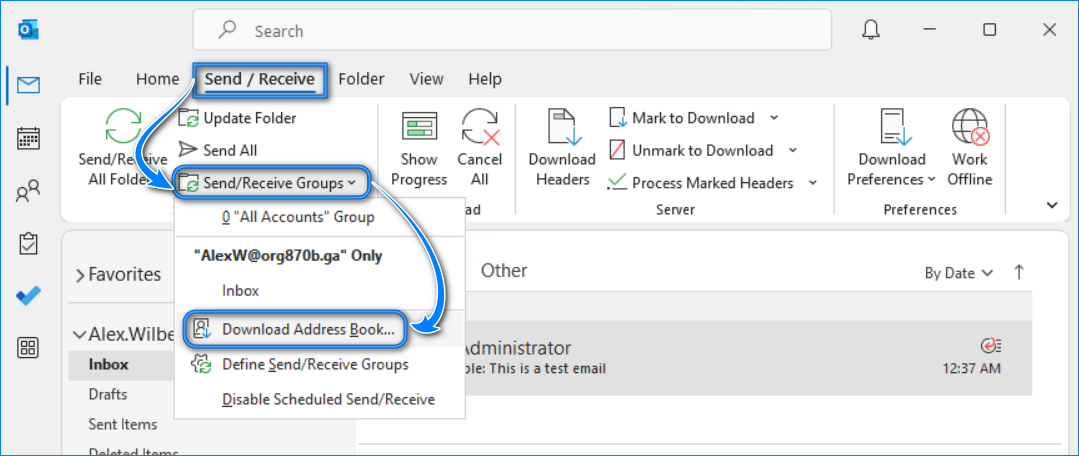
- In Outlook, click the Send / Receive ribbon group > Send/Receive Groups > Download Address Book.
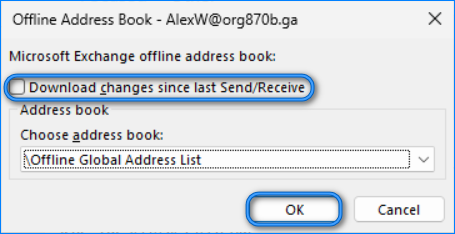
- Uncheck the Download changes since last Send/Receive box and click OK. Doing so means Outlook will rebuild the OAB files.
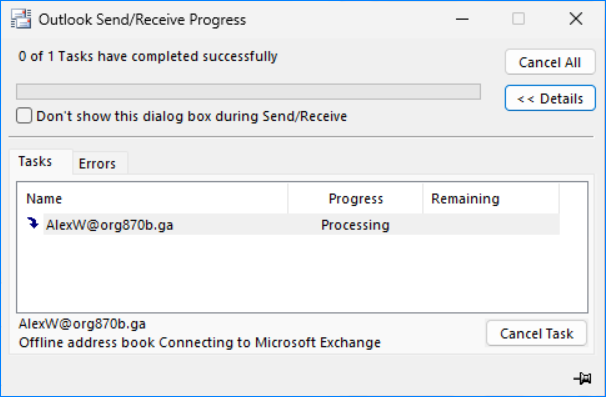
- Wait for the OAB download to complete.
Solution 2: Delete the offline address book files
If the error persists, then it could be the OAB is beyond repair. In this case, you must delete the existing OAB file to have them recreated.
- Close Outlook.
- Locate the Offline Address Book files. The default location on Windows 7 and above is C:\Users\Username\AppData\Local\Microsoft\Outlook\Offline Address Book.
- Rename the GUID-named folder. In this example, we’ll rename 6dc407a3-abbb-4f24-949c-fa669b396ba9 to 6dc407a3-abbb-4f24-949c-fa669b396ba9.old.
Note. If you have multiple Outlook profiles set up, there will be an equal number of OAB folders.
- Re-open Outlook, and the OAB folder will be recreated automatically.
- Re-download the Offline Address Book.
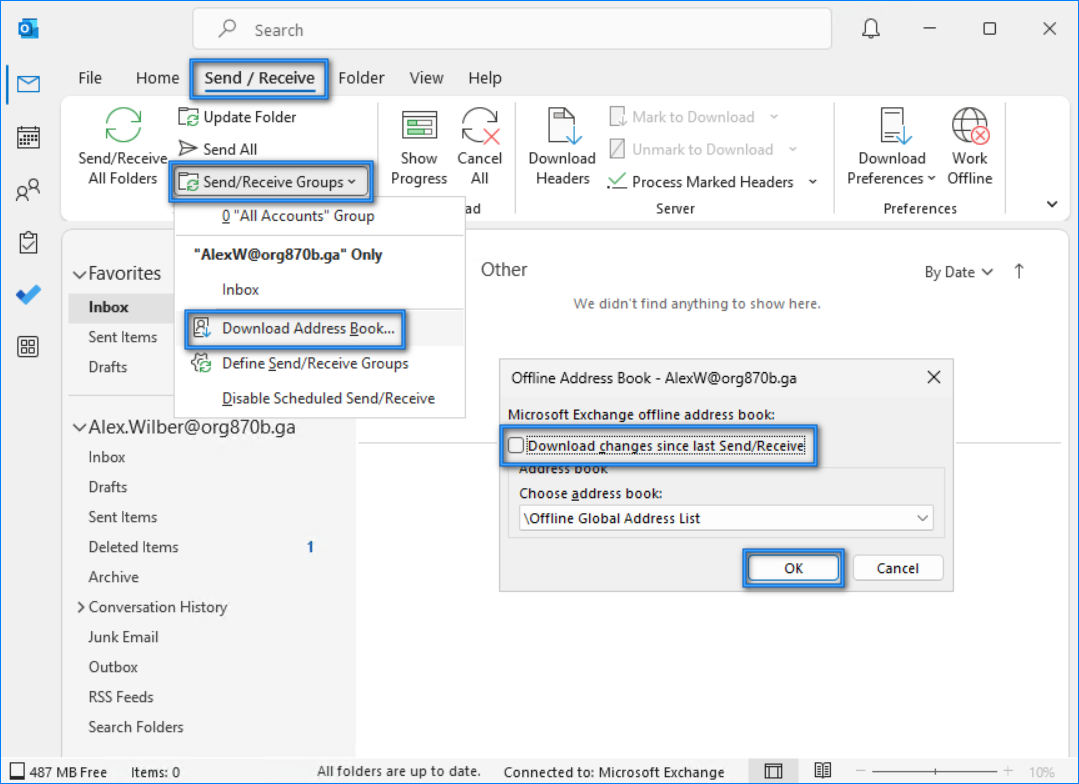
The Offline Address Book files have been recreated.
Note. Learn how to enable external email forwarding in Microsoft 365.
Possible Cause: Missing Send As Permission
The error 0x80070005 translates to a permission problem. Perhaps the user didn’t have the appropriate Send As permission to the mailbox. But if the user did, the permission may have been removed if the mailboxes were migrated from On-Premises to Exchange Online.
Solution 1a: Add Send As Permission via PowerShell
- Open PowerShell and connect to Exchange Online.
- Run the following command to give Send As permission to the mailbox. In this example, the shared mailbox is Mailer365, and the user to have permission is AlexW.
Add-RecipientPermission Mailer365 -AccessRights SendAs -Trustee AlexW
- Confirm that the permission is applied:
Get-RecipientPermission Mailer365 -Trustee AlexW
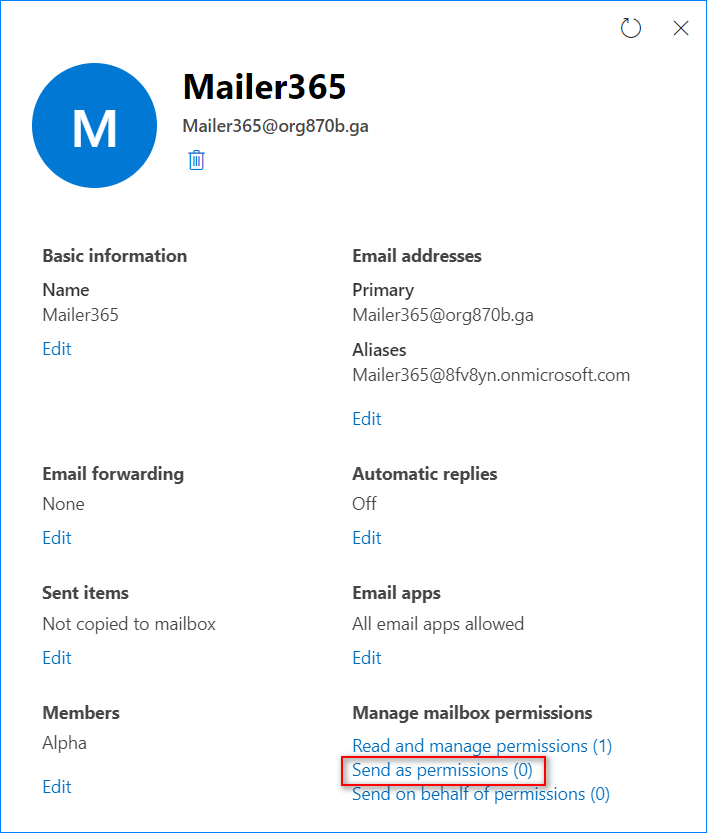
Solution 1b: Add Send As Permission via the Admin Center
- Log in to the Microsoft 365 Admin Center.
- Navigate to Teams & groups > Shared mailboxes and select the shared mailbox from the list.
- Under Mailbox permissions, click the Send as permissions link.
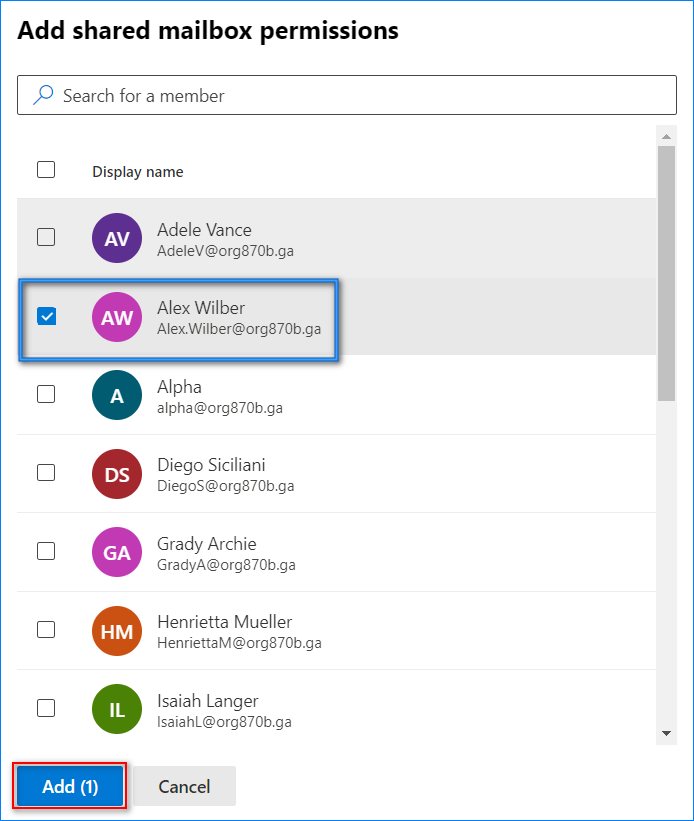
- Click Add permissions.
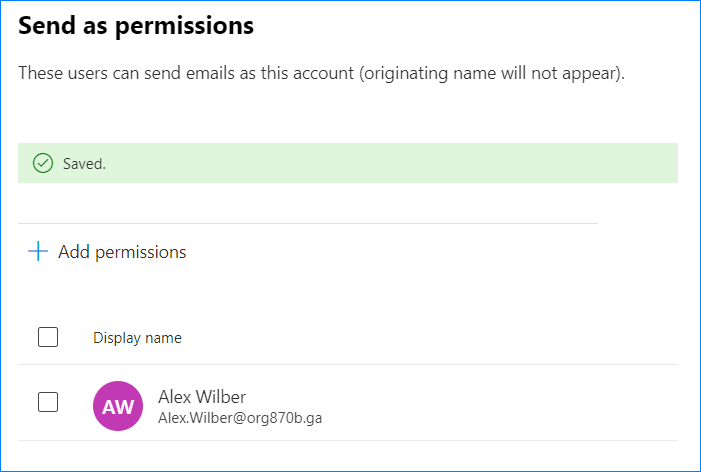
- Select the user(s) who will be given Send As permission and click Add.
- Ask the user to wait several minutes to allow for propagation and try sending as the shared mailbox again.
Referer. Check our tutorial on how to add calendar permissions in Office 365 via PowerShell.
Conclusion
The 0x80070005 error message “This message could not be sent. Try sending the message again later” is a common issue users may encounter when sending emails. Several possible causes for this error include network connectivity problems, mailbox size limits, and email content issues.
Fortunately, users can take several troubleshooting steps to resolve this issue, such as checking the internet connection, reducing the size of the mailbox, or modifying the email content. Additionally, it is always a good idea to keep Office 365 up to date with the latest updates and patches, as these can often address known issues and improve the software’s overall functionality.
Overall, by following these best practices and taking advantage of the built-in support resources provided by Office 365, users can minimize the risk of encountering the “This message could not be sent” error and ensure that their email communications are as reliable and efficient as possible.



![this message could not be sent. try sending the message again later, or contact your network administrator. you do not have the permission to send the message on behalf of the specified user. error is [0x80070005-0x0004dc-0x000524]. this message could not be sent. try sending the message again later, or contact your network administrator. you do not have the permission to send the message on behalf of the specified user. error is [0x80070005-0x0004dc-0x000524].](png/untitled-335.png)
 The Offline Address Book files have been recreated.

![error is [0x80070057-0x00000000-0x00000000]. error is [0x80070057-0x00000000-0x00000000].](png/untitled-339.png)
![error is [0x80070005-0x000004dc-0x00000524]. error is [0x80070005-0x000004dc-0x00000524].](png/word-image-6686-12.png)
![error is [0x80070057-0x00000000-0x00000000] error is [0x80070057-0x00000000-0x00000000]](png/untitled-341.png)
1 comment
Your article was the first that fit my problem after several hours of search. However, after renaming the Offline Address Book to “.old”, a new folder did NOT appear when I opened Outlook. Any ideas why that might be? Could it be that I have 55,000 contacts, or that the Outlook profile has 3 email addressses? Thx