Is your Azure VM running out of disk space? The default OS disk size varies depending on the VM you deploy. For some, a 128GB OS disk is enough. But with constant updates and package/software installation, the free space can shrink uncontrollably.
The good news is that you can conveniently resize Azure VM disks in a few ways. Whether you favor the GUI or command line, you can perform any Azure VM resize disk operation and achieve the same result. This applies to both OS and data disks in Windows or Linux VMs.
Table of Contents
How to Resize Azure VM Disk using the Portal
First, let’s look at resizing an Azure VM disk using the Azure Portal. In this example, we’re increasing the OS disk size on a Windows VM named windowsDemo.
- Log in to the Microsoft Azure Portal.
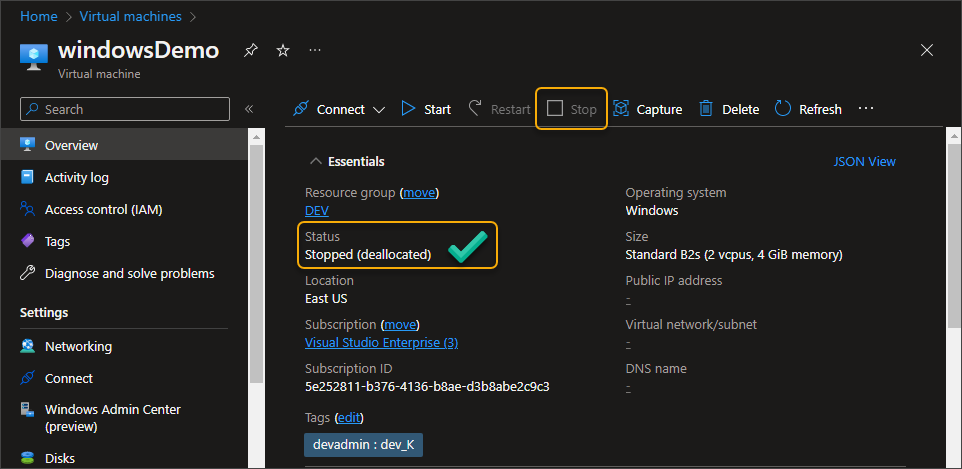
- Open the Azure VM where the disk to resize is attached and ensure its status is Stopped. If not, stop the VM first.
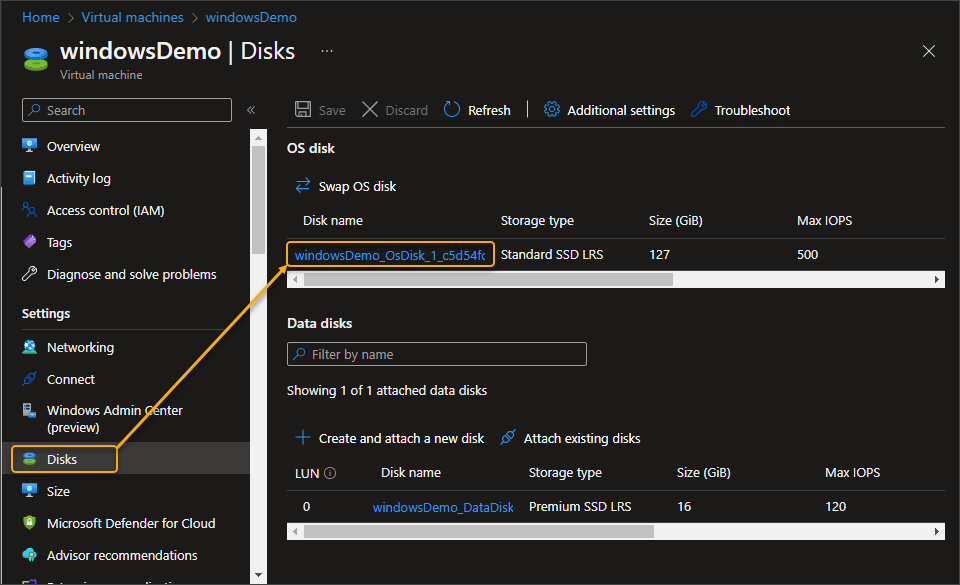
- Next, click Disks. As you can see below, two disks are attached to the VM; one OS disk and one data disk. In this example, we’re resizing the OS disk.
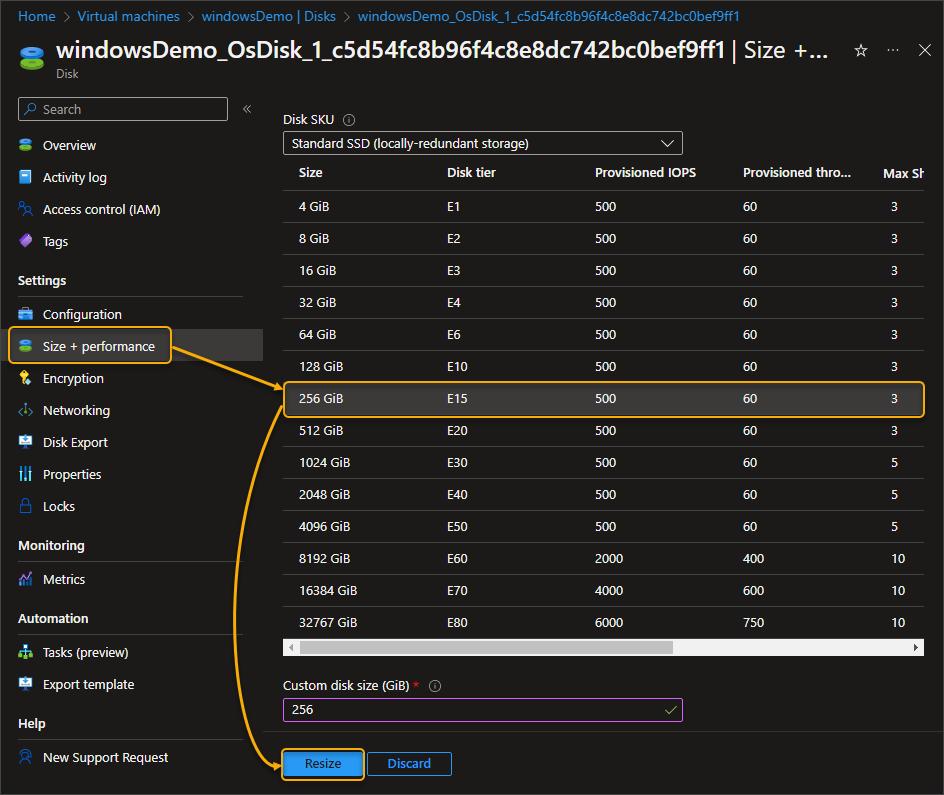
- Next, click on the Size + performance blade. You can choose the disk SKU and the new disk size on this blade.
Let’s choose 256GB as the new OS disk size in this example, but we will not change the SKU and leave it as is. Click Resize to resize the disk.
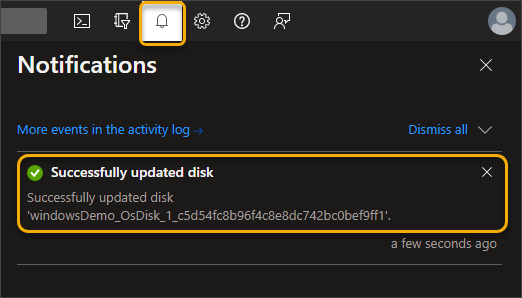
- Wait for the Azure VM resize disk operation to complete, and you should see a confirmation message, as shown below.
- At this point, you can now start the Azure VM again and log in to the operating system.
Note. Check our article How to add or remove Azure Resource Lock.
Extend the Volume Inside the Windows VM
Once you log in to the VM, you’ll notice that the volume size hasn’t changed, although you’ve already performed the Azure resize OS disk process. That’s because you only increased the virtual hard disk size (256GB), but the logical volume partition remains the same (127GB).
Let’s now expand the volume to occupy the new free space.
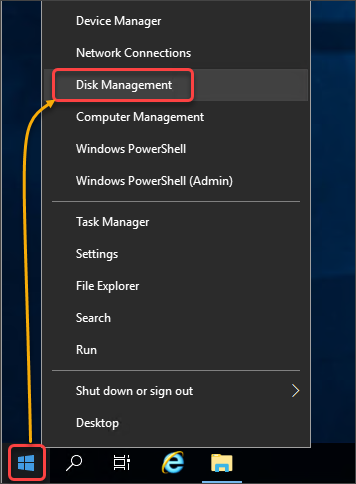
- First, open the Disk Management console. Right click the Start button and click Disk Management.
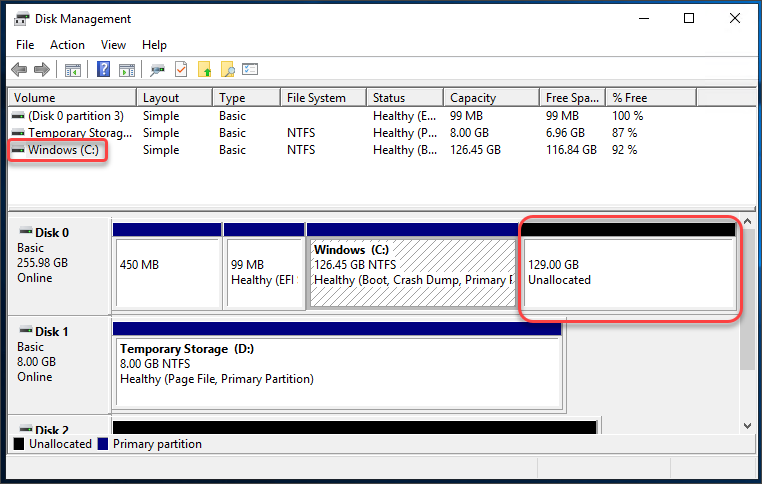
You’ll see that the OS disk now has unallocated space.
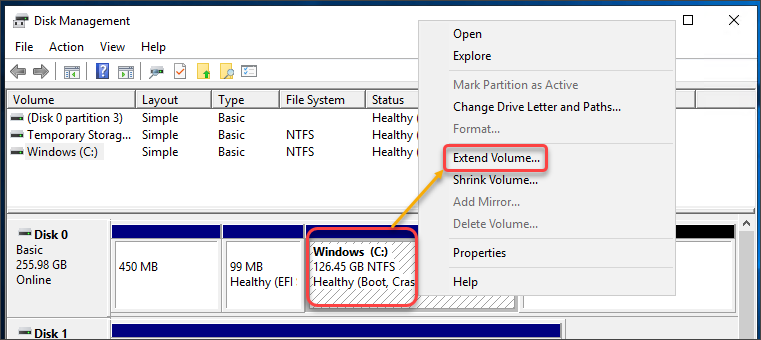
- Next, right-click on the system partition and click Extend volume.
- Click Next on the Welcome page.
- The Wizard automatically populates the maximum available disk space. Keep the maximum value and click Next.
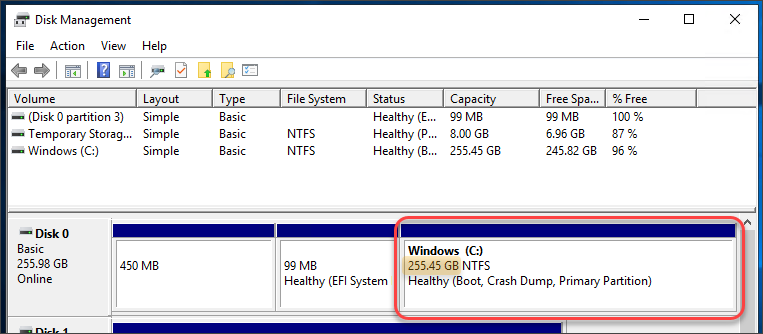
- Click Finish on the Wizard. The OS volume has now increased to 256GB, as intended.
How to Resize Azure VM Disk using PowerShell
This time let’s perform an Azure increase disk size operation using PowerShell. You can perform this method on your local computer using the Azure PowerShell module or the Azure Cloud Shell.
In this example, we’ll resize the data disk on a Linux VM called ubuntuDemo.
- If you’re using the Azure PowerShell module locally, log in to Azure by running the following command:
Connect-AzAccount
- Next, make sure to select the correct Azure subscription so that you can access the right resources:
Get-AzSubscription
- Next, define the VM name and resource group where it resides:
$vmName = 'ubuntuDemo'

$resourceGroupName = 'DEV'
- Stop the Azure VM if it is currently running:
Stop-AzVM -ResourceGroupName $resourceGroupName -Name $vmName
- Retrieve the Azure VM object and store it in the $azVM variable:
$azVM = Get-AzVM -Name $vmName -ResourceGroupName $resourceGroupName
- Next, get the name of the data disk you want to resize and its resource properties:
# Display the data disk name

$azVM.StorageProfile.DataDisks.Name

# Get the disk details

$disk = Get-AzDisk -ResourceGroupName $resourceGroupName -Name 'disk name here'
- Now, let’s increase the disk size to 64GB:
# Increase the disk size value

$disk.DiskSizeGB = 64

# Update the data disk with the disk

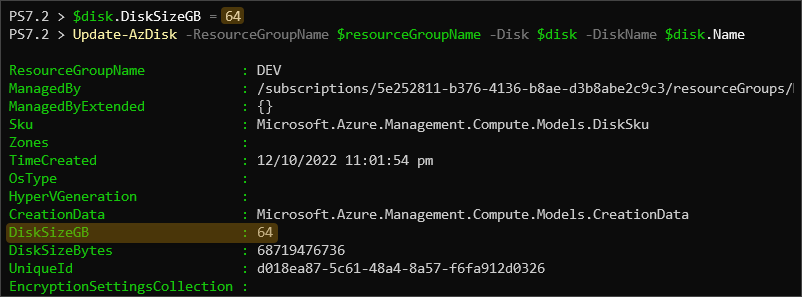
Update-AzDisk -ResourceGroupName $resourceGroupName -Disk $disk -DiskName $disk.Name
Now you should see the result says that the DiskSizeGB is not 64 (GB).
- Finally, start the VM:
Start-AzVM -ResourceGroupName $resourceGroupName -Name $vmName
Note. Learn how to fix an RDP connection error This computer can’t connect to the remote computer.
Extend the Partition and Filesystem Inside the Linux VM
You’ve successfully resized the Azure disk, but your job is half done. You still need to resize the partition and file system inside the Linux VM.
- Log in to the Linux Azure VM:
ssh devadmin@ubuntuDemo
- Next, list the partitions and look for the one to resize:
df -Th
In this case, the data disk partition is /dev/sdc1 mounted on /datadisk.
- Unmount the partition before making any changes:
sudo umount /dev/sdc1
- Enter the parted utility and select the /dev/sdc disk:
sudo parted /dev/sdc
- Run the print command to display the disk information and partition layout. As you can see below, the underlying disk size is 68.7GB, but the existing partition size is only 34.4GB. Note the partition number.
- Resize the partition by running the resizepart command. To break down the command: 1 is the partition number, 68.75GB is the maximum disk size:
resizepart 1 68.75GB
print
As you can see, the partition size is now 68.7GB.
- Next, resize the filesystem using the resize2fs command:
sudo resize2fs /dev/sdc1
- After resizing the disk and partition, you can now re-mount the partition:
sudo mount /dev/sdc1 /datadisk
- Finally, confirm the partition is mounted and that the size is updated:
df -Th
Conclusion
Congratulations! You’ve just performed the Azure VM resize disk methods — using the Portal and PowerShell. You also completed resizing volumes, partitions, and filesystems inside the Windows ad Linux VM operating systems.


 You’ll see that the OS disk now has unallocated space.