Today we will show you how to deploy Microsoft Office 2016/2019 and 365 on clients’ computers using Microsoft Deployment Toolkit 2013. We assume that you are already read our previous article on MDT, which describes how to install MDT 2013 and the Windows Deployment Services role on Windows Server 2012 R2 and use this combination for the network deployment of Windows 10. To accomplish this task, you need a server with installed MDT, Windows Assessment and Deployment Kit and MS Office 2016 image. You can download it from the Microsoft download center. If you need to deploy Office 2019 or 365, go to the appropriate section of the article, as the installation of these products is not based on the classic MSI, but on the new Click-to-Run (C2R) platform.
How to Deploy MS Office 2016 with MDT?
Let’s consider how to deploy Office Professional Plus 2016 with MDT.
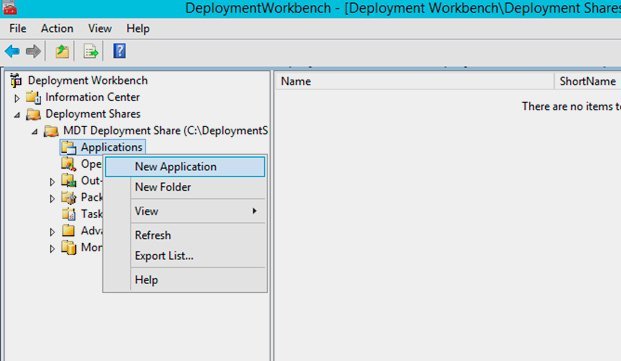
Open Deployment Workbench console and expand Deployment Shares > MDT Deployment Share > Application and on the shortcut menu click on New Application.
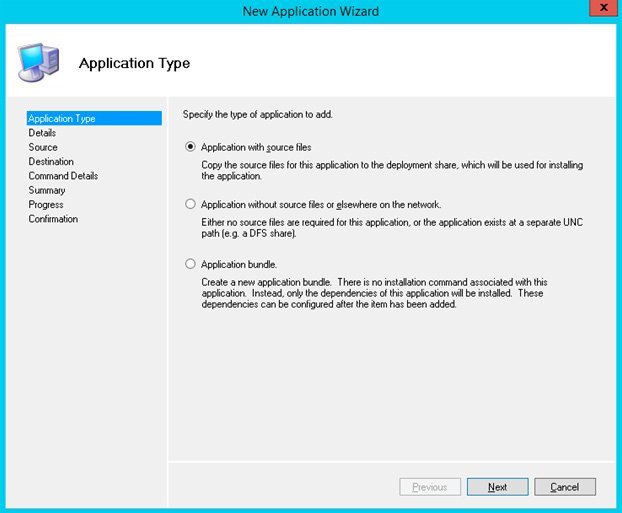
Select Application with Source Files.
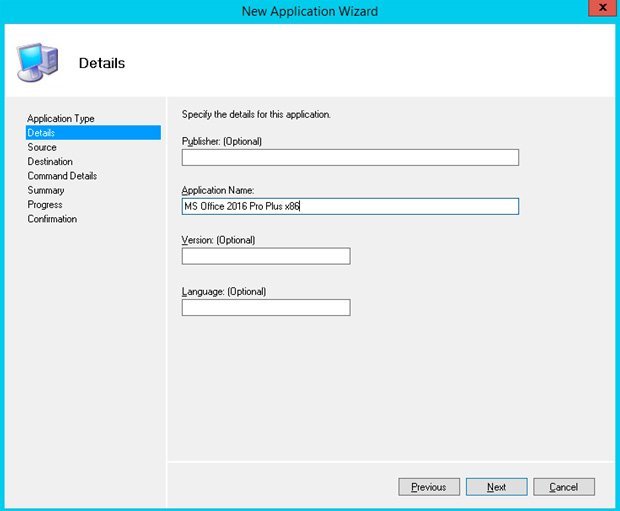
Enter Application Name (MS Office 2016 Pro Plus x86). All other fields are optional. Click Next.
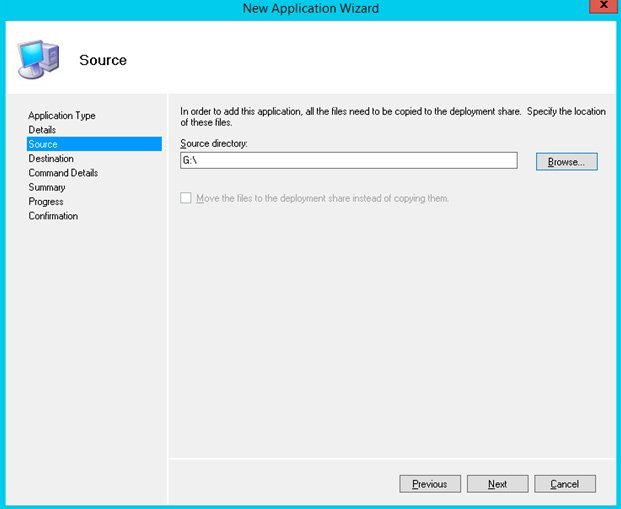
Click Browse and go to the folder with the distribution package of Office 2016.
Specify the name of a directory on the MDT server that will be used to store MS Office 2016 installation files.
In the Command line field, enter the name of Office 2016 executable setup file (setup.exe).
View the specified settings on the Summary page and click Next.
Wait until the end of copying operations and Office application importing to MDT distribution directory. Usually, it takes about 5–7 minutes. Click Next > Finish.
Verify that the new application MS Office 2016 Pro Plus x86 appears in the Applications section.
In the Deployment Workbench console, select the Properties of the created application.
On MS Office 2016 Pro Plus x86 Properties go to Office Products tab.
Specify the following settings:
- Office product to install: ProPlus;
- Office Languages: select languages to force the installation of specific language packs;
- Product key: input Office 2016 MAK key (if applicable)
Tip. Later you can change the Office product key from MAK to KMS; - Display Level: None;
- Accept EULA: True;
- Always suppress reboot: True.
Tip. To configure deployment configuration options of Office installation package you can use the Office Customization Tool (OCT) from Office 2016 Deployment Tool. You can use OCT to create a special update file with installation settings (.MSP), which will be automatically applied during Office 2016 installation. MDT allows direct access to the OCT wizard. Press Office Customization Tool button and configure which components and features of Office should be installed during deployment. Generated MSP file is automatically saved in directory Updates of the Office 2016 source directory on MDT share.
Also, you can change the quiet install Command line to use specific customization package:
setup.exe /adminfile “192.168.1.24\deploymentshare$\Applications\MS Office 2016 Pro Plus x86\Updates\setup.msp”
Next we need to create a new task sequence that will be used to deploy Office 2016 via MDT. To do this, expand Task Sequences and in context menu select New Task Sequence.
Input Task sequence ID (Office2016x86) and Task sequence name (MS Office 2016 Pro Plus x86).
From the dropdown menu select Custom Sequence and click on Next.
Check your Settings, click Next and Finish to create the Task Sequence.
In the right pane of Task Sequence you will see a new task named MS Office 2016 Pro Plus x86.
Right click on task MS Office 2016 Pro Plus x86 and select Properties. Switch to the Task Sequences tab and select the Install Applications option. Select Install a single Application on the right pane and using Browse button select MS Office 2016 application which you created before. Click OK to save settings.
So, we have finished Task Sequence configuration, and now are ready to deploy Office 2016 on clients’ computers. You can simply use this task inside the Windows 10 deployment task or install it independently.
To verify the Office 2016 installation package, you can run it manually from MDT server. Open the Deployment share from client computer using its UNC path (in our case, 192.168.1.24\deploymentshare$). Open Scripts folder and run the file Litetouch.vbs.
Wait until Windows Deployment Wizard starts and select Task Sequence MS Office 2016 Pro Plus x86 and click Next.
Wait until the installation is completed and try to run desired MS Office application. If the application starts correctly, you can begin to deploy this Office 2016 package on multiple computers.
Deployment of Office 365/Office 2019 using MDT
The main difference between Office 365/Office 2019 and Office 2016/2013/2010 is that new versions are installed only using the Click-to-Run (C2R) technology (in earlier version Office was installed using classical MSI—Microsoft Installer). This means that you can’t download the full Office 365/2019 distribution, and when you start the Office installation via C2R, the latest version of the package is automatically downloaded from the Office CDN network.
However, enterprise customers can build their own Office 365/Office 2019 Click-to-Run installation with the Office Deployment Tool (ODT). Below we will show to download installation files and deploy Office 365 or Office 2019 with the ODT and Microsoft Deployment Toolkit (MDT).
Download the latest version of Office Deployment Tool (ODT).
At the moment, the file is called officedeploymenttool_11901-20022.exe.
Install the Office Click-to-Run ODT Administrator Tool.
4 files will appear in the ODT installation directory:
- setup.exe;
- configuration-Office365-x64.xml;
- configuration-Office365-x86.xml;
- configuration-Office2019Enterprise.xml.
Copy these files to your MDT server into a directory ..Applications/Office365.
You must edit the XML file depending on the version of Office that you want to install. For example, you want to deploy Office 365 Pro Plus x64 through MDT. In this case, you need to edit the XML file configuration-Office365-x64.xml. Paste the following configuration into xml file:
<Configuration ID="2526ac9e-ce78-4a75-8ca8-31f470a9a655">

<Add OfficeClientEdition="64" Channel="Broad" SourcePath="192.168.1.24deploymentshare$ApplicationsOffice365" AllowCdnFallback="TRUE" ForceUpgrade="TRUE">

<Product ID="O365ProPlusRetail">

<Language ID="en-us" />

<Language ID="de-de" />

<ExcludeApp ID="Groove" />

<ExcludeApp ID="OneDrive" />

<ExcludeApp ID="OneNote" />

<ExcludeApp ID="Publisher" />

</Product>

</Add>

<Property Name="SharedComputerLicensing" Value="0" />

<Property Name="PinIconsToTaskbar" Value="TRUE" />

<Property Name="SCLCacheOverride" Value="0" />

<Property Name="AUTOACTIVATE" Value="0" />

<Property Name="FORCEAPPSHUTDOWN" Value="FALSE" />

<Property Name="DeviceBasedLicensing" Value="0" />

<Updates Enabled="TRUE" />

<RemoveMSI />

</Configuration>
Let’s consider the main config option:
- SourcePath — in the XML file, we indicated that the installation files should be taken from the specified directory (if it is not available, the CDN will be used to download distribution files);
- Product ID — Perform the installation of Office 365 Pro. If you want to install Office 2019 Volume Edition, use the following value : Product ID=”ProPlus2019Volume” Channel=”PerpetualVL2019”;
- Language ID — two language support is added: En and De;
- ExcludeApp — don’t install these applications;
- Updates Enabled — enable automatic update of Office356 from CDN;
- RemoveMSI — remove old MSI Office versions (Office 2016/2013/2010).
Note. When you install Office 2019/Office 2019, all applications are installed by default. But you can customize the Office Deployment Tool to exclude certain applications from the installation process using the ExcludeApp configuration option.
Now start downloading Office365 installation files from the CDN. Use the following command:
YourMDTServer\deploymentshare$\Applications\Office365\setup.exe /download
YourMDTServer\deploymentshare$\Applications\Office365\configuration-Office365-x86.xml
Once the Office 365 installation files according to your configuration are downloaded, create a new O356configuration.xml file to install Office 365 through MDT. Use the following config:
<Configuration>

<Add OfficeClientEdition="64">

<Product ID="O365ProPlusRetail" >

<Language ID="en-us" />

<Language ID="de-de" />

</Product>

</Add>

<Display Level="None" AcceptEULA="TRUE" />

</Configuration>
Save this file in the Office365 directory on the MDT server (we don’t specify the SourcePath in the configuration file, because by default setup.exe looks for installation files in the root folder, where it is located).
It remains to create an Office 365 application and import the installation directory into the MDT (Deployment Workbench > Applications > Import).
Use the following instruction in a Command line: setup.exe /configure O356configuration.xml.
Now you can deploy Office 365 with MDT, either by adding the application in the task sequence (as mentioned above) or by selecting the application on the deployment wizard.


