MongoDB is a popular open-source NoSQL database management system that provides a flexible and scalable solution for storing and managing data. In this tutorial, we will guide you through the process of installing and configuring MongoDB on Ubuntu 22.04, enabling you to get started with this powerful database system.
Table of Contents
Requirements
Before we begin, ensure that you have the following:
- An Ubuntu 22.04 server.
- A user account with sudo privileges.
Set Up the MongoDB Repository
The latest official MongoDB package is not available in the default Ubuntu repositories. So before the APT package management can find it, we must ensure it knows the MongoDB repository.
- On the terminal, run this command to import the MongoDB public GPG key.
This command explicitly downloads the GPG key for version 6.0. If you intend to download a different version, replace the 6.0 portion in the URL and destination file with the specific version.curl -fsSL https://pgp.mongodb.com/server-6.0.asc | \ sudo gpg -o /usr/share/keyrings/mongodb-server-6.0.gpg \ --dearmor
- Next, add the MongoDB repository for Ubuntu 22.04. To do so, run this command in the terminal:
echo "deb [ arch=amd64,arm64 signed-by=/usr/share/keyrings/mongodb-server-6.0.gpg ] https://repo.mongodb.org/apt/ubuntu $(lsb_release -cs)/mongodb-org/6.0 multiverse" | sudo tee /etc/apt/sources.list.d/mongodb-org-6.0.list
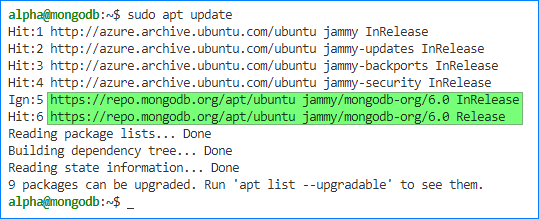
- Update the local package index.
sudo apt update
The package manager is now aware of the MongoDB repository.
Install MongoDB on Ubuntu
The MongoDB repository has been set up, and we can now install MongoDB on Ubuntu 22.04. Execute the following steps to install MongoDB.
- Run this command to install the mongodb-org package:
sudo apt install mongodb-org
When prompted to continue, press Y and Enter.
- Once installed, the MongoDB (mongod) daemon default state is disabled. Meaning that it will not run automatically. Run the following commands to enable, start, and check the mongod daemon.
sudo systemctl enable mongod

sudo systemctl start mongod

sudo systemctl status mongod
- Lastly, confirm that MongoDB listens to the default port 27017 on the loopback address:
sudo netstat -plntu
As you can see below, mongod is listening to 127.0.0.1:27107.
Configure MongoDB
After successfully installing MongoDB, we must configure it to suit our requirements. Let’s explore the provided MongoDB configuration file and understand its basic settings:
Default MongoDB Configuration
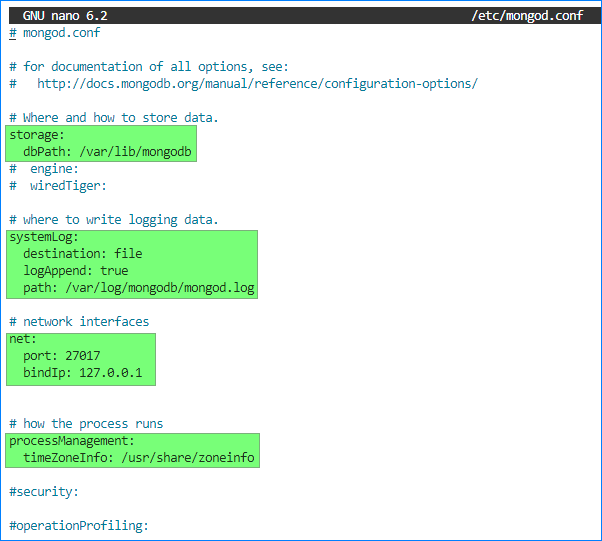
The MongoDB configuration file is located at /etc/mongod.conf. Open the MongoDB configuration file (/etc/mongod.conf) using a text editor, and you will find the following settings:
Below is the breakdown of each config section.
- storage: This section configures storage-related settings.
- dbPath: specifies the directory where MongoDB stores its data files. The default is /var/lib/mongo.
- systemLog: This section defines the MongoDB system log options.
- destination: file specifies the destination of all log output. The options are file (default) and syslog.
- path: sets the path for the MongoDB log file. The default path is /var/log/mongodb/mongod.log.
- logAppend: enables or disables appending log messages to an existing log file. This setting accepts the Boolean value true or false. The default is true.
- net: This section controls network-related settings.
- bindIp: specifies the network interface that MongoDB will only listen on. The MongoDB listens only on the local loopback interface (localhost) by default.
- port: sets the MongoDB port. The default is 27017.
- processManagement: This section defines the process management options.
- timeZoneInfo: specifies the full path of the time zone database. The default time zone database path is /usr/share/zoneinfo.
Custom MongoDB Configuration
For most standalone MongoDB deployments, the base configuration is sufficient. But there are many custom configurations that you can implement based on your requirements. Here are some of them.
You can find all configuration file options in the official MongoDB documentation.
- Role-Based Access Control — This configuration is controlled by security.authorization. By default, this setting is disabled, which means users can access any database. To enable this setting, add the following entry in the configuration file.
- security:
authorization: true - WiredTiger Cache Size — WiredTiger is MongoDB’s default storage engine. By default, WiredTiger will use 50% of the RAM or 256MB, whichever is higher, for its internal cache.
- For example, for a computer with 8GB of RAM, the maximum WiredTiger cache is 3.5 GB.
- (8GB – 1GB) * 0.5 = 3.5GB
- On a computer with 1.25GB only, the maximum WiredTiger cache is 256 MB because it is higher than the below result.
- (1.25GB – 1GB) * 0.5 = 125MB < 256MB
- While it is not recommended to set the maximum WiredTiger Cache Size manually, you can modify it by adding the storage.wiredTiger.engineConfig.cacheSizeGB setting. For example, the below directive sets the maximum size to 3 GB.
- storage:
engine:
wiredTiger:
engineConfig:
cacheSizeGB: 3
Note. Restart the mongod service after modifying the MongoDB configuration.
Interacting with MongoDB using the MongoDB Shell (mongosh)
The MongoDB Shell is included in the MongoDB server installation. It allows you to interact with MongoDB using the command line tool called mongosh. The MongoDB Shell is the new shell for MongoDB 6.0. The legacy Mongo Shell (mongo) was deprecated in MongoDB 5.0.
In the following sections, we’ll perform some initial tasks using the MongoDB Shell.
Create a New MongoDB Root Account
You can connect to MongoDB by running mogosh on the terminal by default.
At this point, there are no users yet, and access is unrestricted. To confirm, run the show users command; the result will be empty.
To manage MongoDB effectively, creating a dedicated root account is recommended. Follow these steps to create a new MongoDB root account:
- Switch to the admin database by executing the following command:
use admin
- Now, run the db.createUser() method. This example creates a new user called mongodba1 with the root role access.
db.createUser({ user: "mongodba1", pwd: "Hesitate#Geometry#Unvalued0", roles: [ { role: "root", db: "admin" } ] }) - Execute the show users command to view the list of users. This time, the new user, mongodba1, should be listed.
- Exit the current MongoDB shell.
quit
- Connect to the MongoDB shell using the new root account:
mongosh -u <username> -p <password>
Or you can drop the -p <password> part so that you are prompted to type your password.
mongosh -u <username>
- Lastly, run the connection status check:
db.runCommand({ connectionStatus: 1 })The command returns the authentication information and the connection status.
Create a New Database
With MongoDB successfully installed and the root user created, let’s create a new database and insert some documents. Follow these steps to perform the operations.
- First, let’s inspect the current databases.
show dbs
As you can see, there are only the default databases.
- There’s no dedicated “create” command to create a database from scratch. Instead, the use <database> command creates the database if it does not exist. In this example, I’ll create the petsdb database.
use petsdb
The shell automatically switches to the new database.
- Now, let’s insert new documents into the pets collection. You can think of a collection as the database table and the document as the record:
db.pets.insertOne({ name: "Tobey", type: "Dog", age: 12 }) db.pets.insertOne({ name: "Riley", type: "Dog", age: 8 }) db.pets.insertOne({ name: "Tabetha", type: "Dog", age: 6 }) - Now you can list all documents in the collection like so:
Or you can query specific documents.
db.pets.find({“name”:”Tabetha”})
In case you’re wondering, the above command is the equivalent of this SQL query:
SELECT * FROM PETS WHERE name=’Tabetha’;
Conclusion
Following the step-by-step guide outlined in this blog post, you can ensure a smooth installation experience and leverage MongoDB’s powerful features.
The installation process involved adding the official MongoDB repository, updating the package list, and installing MongoDB. We then explored various configurations to optimize performance and security, including binding to a specific IP address, enabling authentication, and configuring a secure password.
With MongoDB successfully installed and configured, developers, system administrators, and organizations gain a robust and scalable NoSQL database solution. Now armed with the knowledge and skills from this blog post, you can confidently explore MongoDB’s features and elevate your projects to new heights.


 Or you can drop the -p <password> part so that you are prompted to type your password.


 Or you can query specific documents.
 In case you’re wondering, the above command is the equivalent of this SQL query: