If you want to set up an SMTP relay for your LOB applications and internal devices, you won’t have to shell out top dollar for a third-party solution. Microsoft IIS includes an SMTP server feature that’s simple and easy to configure.
This post will guide you to install and configure the IIS SMTP server and how to use it as an SMTP relay. We’ll also look into securing the SMTP transactions with an SSL certificate and direct outbound messages to a smart host for internet message delivery.
Table of Contents
Requirements
- Any version of Windows with IIS 6.0 support, such as Windows Server 2012 and later. This tutorial will use Windows Server 2019.
Installing the IIS SMTP Service
Installing the IIS SMTP Server on Windows is as quick as a one-liner command.
- Log in to the server and open PowerShell as admin.
- Run the following command to install the IIS SMTP server, including the management tools:
Install-WindowsFeature `

-Name SMTP-Server `

-IncludeAllSubFeature `

-IncludeManagementTools `

-Restart
- Ensure that the SMTP service start type is automatic:
Set-Service SMTPSVC -StartupType Automatic
- Confirm that the service is running:
Get-Service SMTPSvc | Select-Object Name,DisplayName,StartType,Status
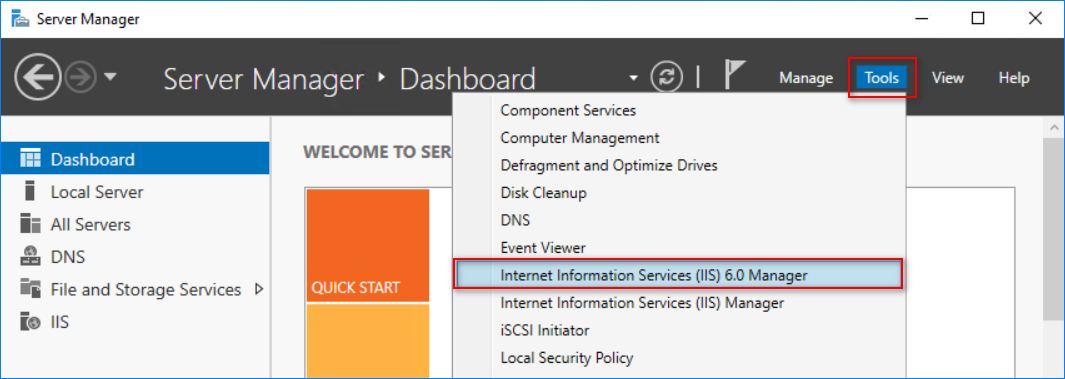
- You can now open the IIS 6.0 manager window.
Using the shortcut in the Administrative Tools folder.
Using the Server Manager.
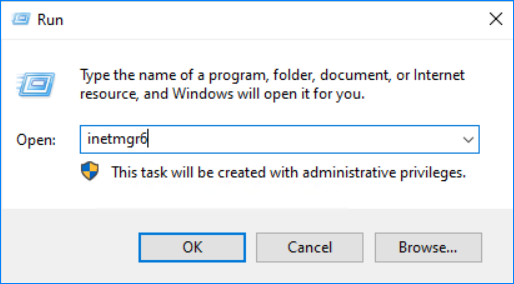
Using the Run command.
inetmgr6
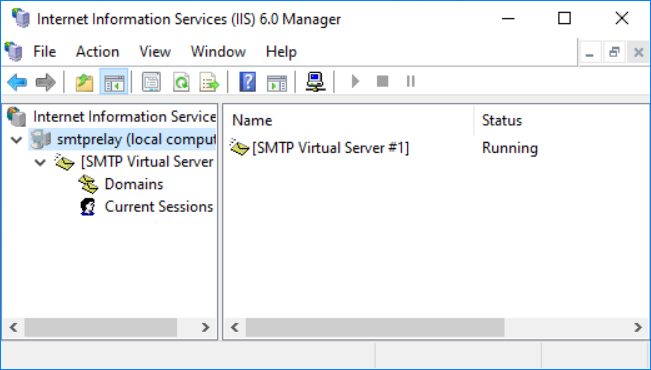
And below is the IIS SMTP server console. As you can see, one virtual SMTP server is already running by default.
Configure IP Binding and SMTP Logging
Before using your IIS SMTP server, ensure that the SMTP logging is enabled. SMTP logs help diagnose and troubleshoot mail delivery problems.
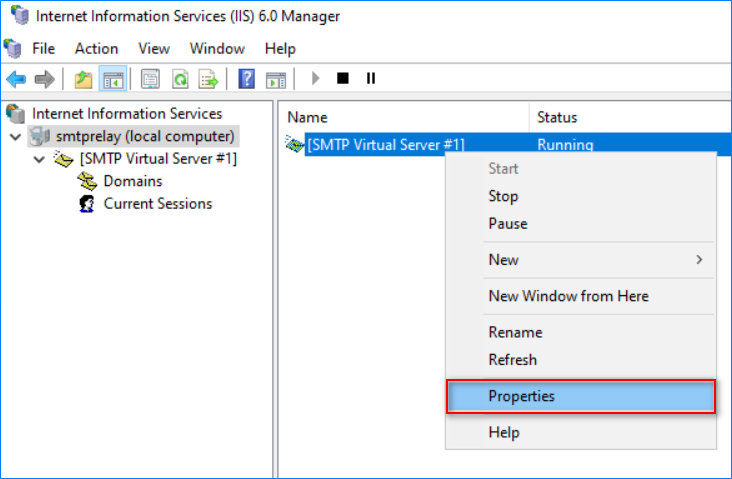
- Right-click the SMTP Virtual Server and click Properties.
- On the General tab, you’ll see the IP address dropdown box.
- If you only have one IP address on the server, you don’t need to change the IP address selection and leave it to default (All unassigned).
- Select the IP address if you plan to assign the virtual SMTP server its own IP.
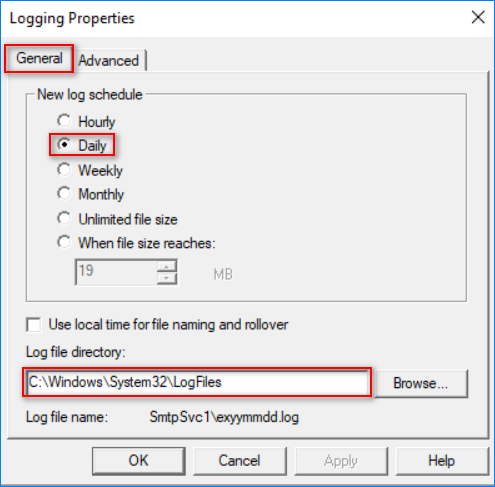
- Check the Enable logging check box, choose the W3C Extended Log File Format, and click Properties.
- On the General tab, select your preferred log schedule (when new logs are created).
- Set the Log file directory. By default, the SMTP log file directory is in C:\Windows\System32\LogFiles. Moving the SMTP logs to a different location than the system drive is recommended.
- Check all the fields you want to log on the Advanced tab, and click OK. In this example, we’ll check all fields.
Enabling the IIS SMTP Server Access and IP Whitelist
SMTP relay access can be anonymous, credentials-based, or IP blacklist/whitelist. In most internal SMTP relay deployments, the access combines anonymous and IP whitelist. This way, clients do not have to configure the authentication and can still relay messages through the IIS SMTP server.
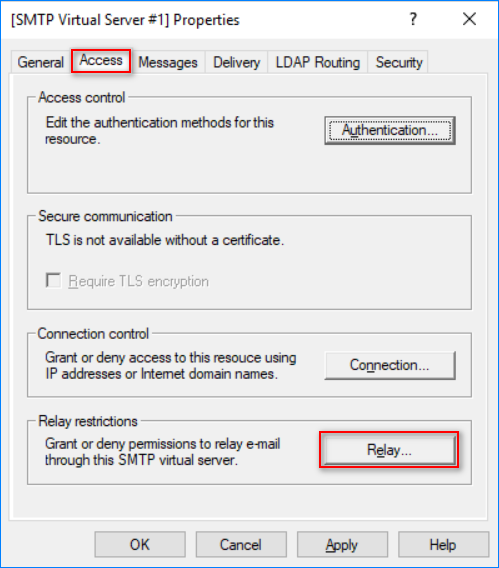
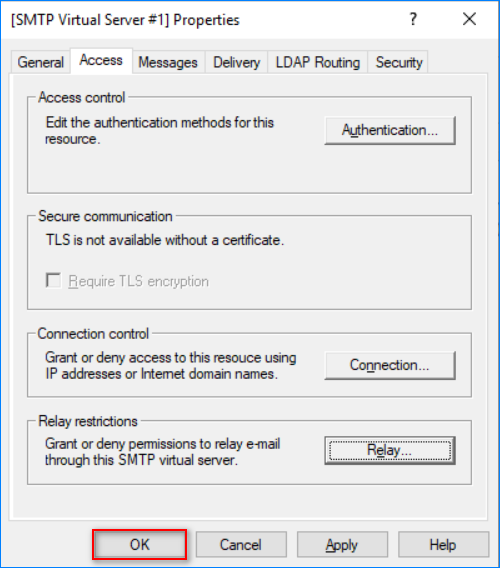
- Go to the Access tab and click Authentication.
- Choose the authentication mechanism that the SMTP clients are required to use. In this example, I’m choosing Anonymous because I will add the IP whitelist next.
- Click Relay.
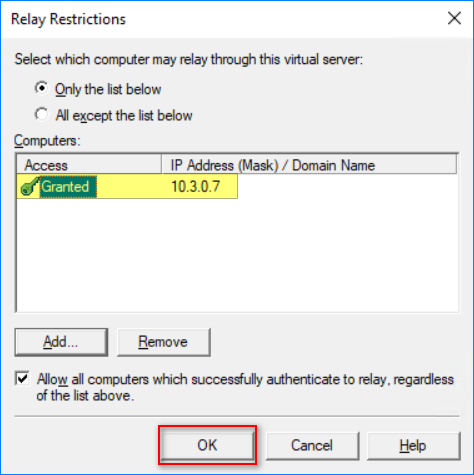
- Select the “Only the list below” option and click Add.
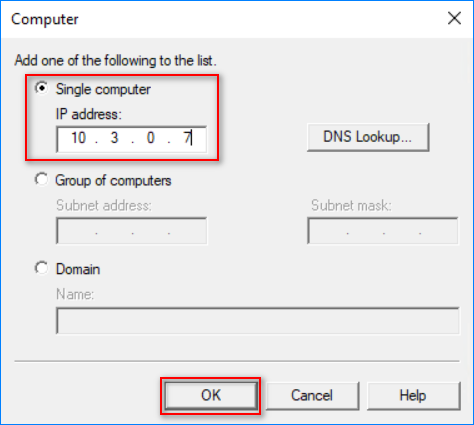
- Select how you want to specify the allowed list. Single computer (IP), group of computers (subnet), or domain. In this example, I’ll enter a single computer’s IP address.
- Click OK after adding the IP.
- Click OK on the SMTP Virtual Server properties to save the configuration.
Setting Up Email Routing
Setting up the email routing means telling the SMTP server where and how to deliver the messages it received for relay.
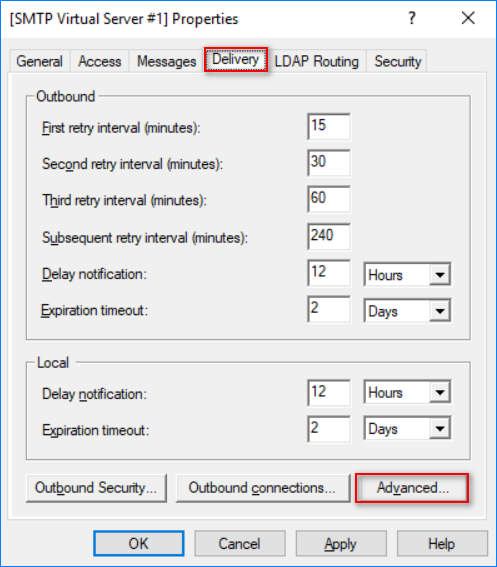
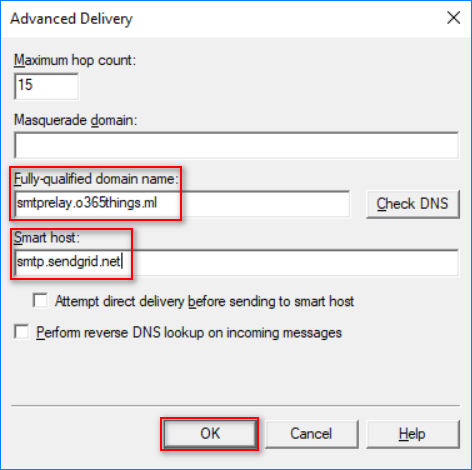
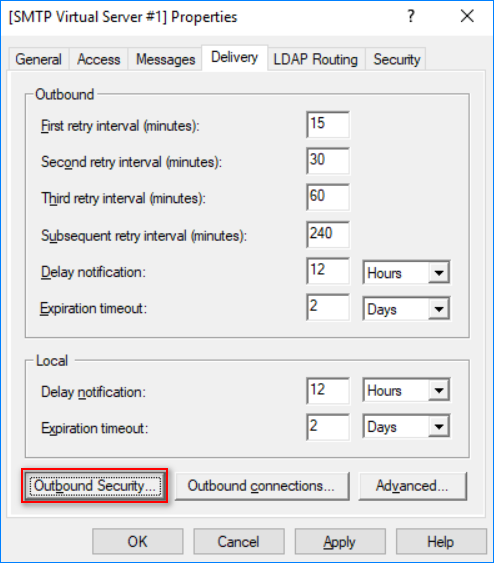
- Go to the Delivery tab and click Advanced.
- Under Advanced Delivery, enter the server’s:
- Fully-qualified domain name — the server’s FQDN that appears in the SMTP header.
- Smart host — the IP address or FQDN of the next hop. This could be your internal email server, Office 365 inbound connector, or a 3rd party SMTP service. In this example, I’m using the SendGrid SMTP relay service.
- Click OK to save the changes.
- Click Outbound Connections.
- Make sure the outbound SMTP port is correct. In most cases, port 25 is the standard. In my case, the smart host uses port 587.
- Click Outbound Security.
- Choose the right authentication option for the smart host you specified. In this example, I chose Basic authentication and entered the username and password because the SendGrid SMTP service requires it. Once you’ve accomplished this setting, click OK.
Testing the IIS SMTP Server Email Delivery
Now that we’ve set up the IIS SMTP server, how do we know it works? Let’s test it.
- To test the relay, log in to the computer whose IP address is in the relay whitelist.
- Open PowerShell and run this command. Update the following property values:
- SmtpServer — the IP address or FQDN of the IIS SMTP server.
- From — the sender’s email address.
- To — the recipients’ email addresses.
- Subject — the message subject.
- Body — the email body content.
$mailProps = @{
SmtpServer = 'SMP.Server'
From = 'someone@mydomain.com'
To = @('someone@somedomain.com')
Subject = 'Test Email'
Body = 'Test Email Body'
}

Send-MailMessage @mailProps
No error means the IIS SMTP server accepted the SMTP transaction.
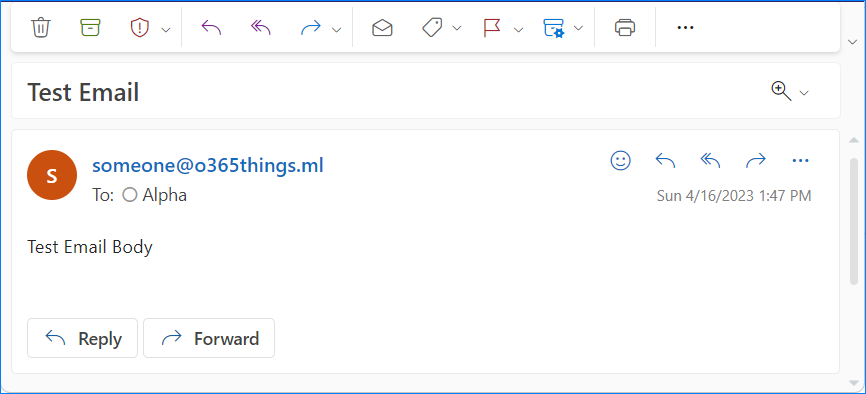
- Check the message in the recipient’s mailbox.
Installing an SSL Certificate
By default, the IIS SMTP server does not use encryption because it requires an SSL certificate, and SSL certificates must be installed. Third-party smart hosts sometimes support only encrypted connections, like with Office 365 inbound connectors.
You may acquire an SSL certificate from a third-party certification authority like DigiCert or VeriSign, among others. And when you do, the IIS SMTP server can use it for transport encryption.
The certificate must be imported to Local Computer > Personal > Certificates.
Open the Virtual SMTP Server properties. Under the Access tab, confirm that the system detects the certificate.
Go to the Delivery tab > Outbound security. Enable the TLS encryption box and click OK.
Now the SMTP outbound connections are encrypted. To confirm, look into the SMTP logs. The example below shows that the TLS negotiation happened and was successful.
Conclusion
Setting up an IIS SMTP server can seem daunting, but with the proper guidance, it can be accomplished in a few simple steps. Following the steps outlined in this blog post, you can set up an SMTP server on your Windows Server, allowing you to send emails from your applications or scripts.
It’s crucial to ensure that your server is secure and that you configure it correctly to avoid any potential spam or unauthorized access issues. With these precautions in mind, you can leverage the power of an SMTP server to improve your application’s functionality and streamline your email communication.


 Using the Server Manager.
 Using the Run command.
 And below is the IIS SMTP server console. As you can see, one virtual SMTP server is already running by default.