In general, Spam, Phishing, and malicious email content come from different sources. The malicious content detection in Office 365 is mostly effective, but no detection solution is perfect. Some can still pass through and reach your users. The Office 365 algorithm will eventually catch these runaways, but there’s no guarantee when.
In cases when you need to block messages from specific sources, Office 365 offers several options to do so in varying scopes. The below methods to block senders are listed in order of precedence.
- Tenant Allow/Block List Rules in Microsoft 365 Defender.
- Anti-Spam Policies in Microsoft 365 Defender.
- Exchange Online Mail Flow Rules.
- Outlook Blocked Senders List.
In this article, we’ll explore these methods and show you how to implement them in your Office 365 tenant.
Table of Contents
Exchange Online Tenant Block List Rule in Microsoft 365 Defender
The Tenant Allow/Block List Microsoft 365 Defender is the first on our list. Blocking senders and domains using this feature precedes every other method in this post.
Using the Microsoft Defender 365 Portal
- Log in to the Microsoft 365 Defender portal.
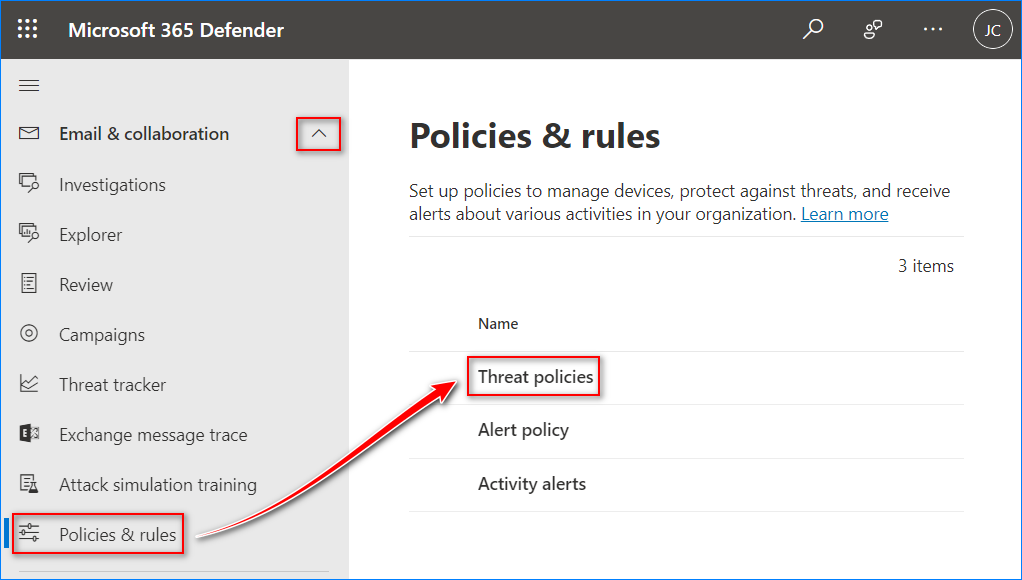
- Navigate to Email & collaboration → Policies & rules → Threat policies.
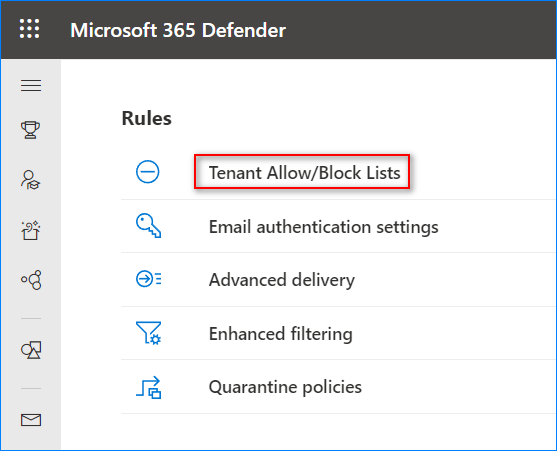
- Click Tenant Allow/Block Lists under Rules.
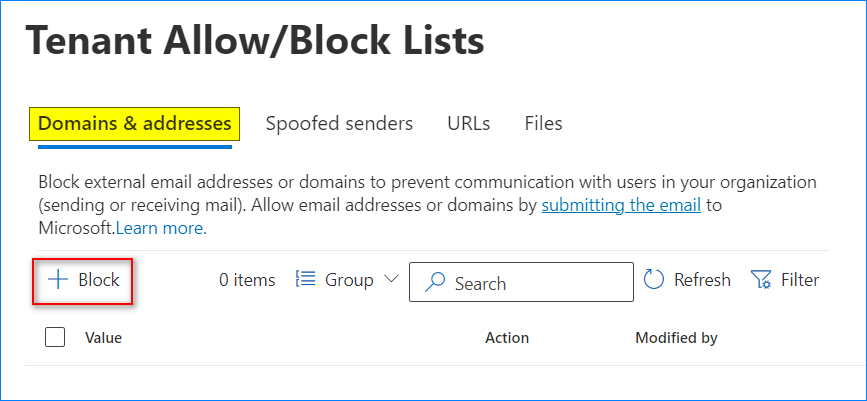
- Under Domains & addresses, click Block.
- Enter up to twenty (20) domains and addresses in the Domains & addresses box. The entries can be in a single line separated by a comma or one entry per line.
- Choose when the block list expires under the Remove block entry after list box. Valid options are:
— 1 day
— 7 days
— 30 days
— Never expires
— Specific date (The maximum value is 90 days from today) - Finally, click Add to save the new block list.
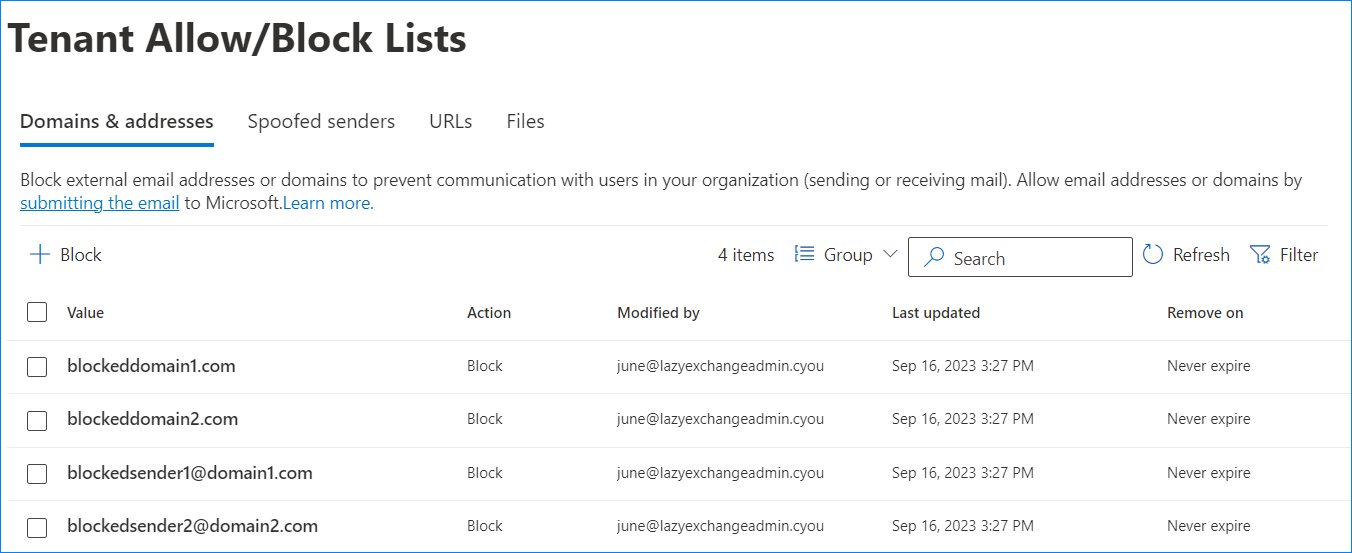
The block list is now created. If you need to add more, repeat from step 4.
Using Exchange Online PowerShell
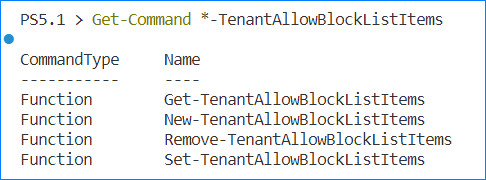
The Exchange Online Management PowerShell module contains four *-TenantAllowBlockListItems cmdlets to manage the Tenant Allow/Block Lists.
- Get-TenantAllowBlockListItems — List the existing Tenant Allow/Block Lists entries.
- New-TenantAllowBlockListItems — Add new Tenant Allow/Block Lists entries.
- Set-TenantAllowBlockListItems — Update Tenant Allow/Block Lists entries.
- Remove-TenantAllowBlockListItems — Remove Tenant Allow/Block Lists entries.
To add new block list entries, first connect to Exchange Online.
Connect-ExchangeOnline -Organization <org.onmicrosoft.com>
Next, compile the block list entries. Note that you can add up to 500 block entries at a time.
$blockList = @(
'gmail.com',
'mailer365@poshlab.xyz'
)
Run the following command to add the block list entry.
New-TenantAllowBlockListItems -Block -ListType Sender -Entries $blockList -ExpirationDate (Get-Date).AddDays(15)
- The -Block switch specifies that you are creating a “Block” entry.
- The -ListType Sender parameter and value specifies that we are creating a “Sender” type block list.
- The -Entries $blockList parameter and value specifies the block list entries stored in the $blockList array variable.
- The -ExpirationDate (Get-Date).AddDays(15) parameter to set the list expiration in 15 days.
To show the block list, run this command.
Get-TenantAllowBlockListItems -ListType Sender -Block |
Select-Object Value, Action, ExpirationDate
Testing and Confirmation
All the tenant block list does is mark all messages from blocked senders as a high confidence spam (SCL = 9). What happens to the email due to this increase in SCL depends on the anti-spam policy that caught the message.
The default Anti-spam inbound policy delivers the message to the recipient’s junk email folder.
In addition, users in your organization will receive an NDR when they send messages to these senders:
Remote server returned ‘550 5.7.703 Your message can’t be delivered because messages to <email address>; are blocked by your organization using Tenant Allow Block List. For more information please go to https://go.microsoft.com/fwlink/?linkid=2237642. AS(8910)’
Exchange Online Anti-Spam Policies in Microsoft 365 Defender
Another way to handle blocking domains and senders is by anti-spam policies. By default, Exchange Online organizations have inbound and outbound anti-spam policies out of the box. But we can create a more granular anti-spam policy with a sender block list configured.
Using the Microsoft Defender 365 Portal
In this section, we’ll edit the default anti-spam policy and add a domain and sender block list using the Microsoft Defender 365 portal.
- Log in to the Microsoft 365 Defender portal.
- Navigate to Email & collaboration → Policies & rules → Threat policies.
- Click Anti-spam under Policies.
- Click the Anti-spam inbound policy (Default).
- Click Edit allowed and blocked senders and domains on the flyout that appears.
- Click the “Manage sender(s)” or “Block domains” link to add blocked senders or domains.
- Add the blocked senders and domains and save the policy.
Note. You can add up to 1000 entries in the block list.
- Click Close.
You’ve created a domain and sender block list in the default anti-spam policy.
However, note that the default anti-spam policy has the lowest priority. This means other anti-spam policies will have a higher priority that will take precedence.
Using Exchange Online PowerShell
We’ll create a new custom block list anti-spam policy in this example using the Exchange Online PowerShell module.
You create two objects when creating a new anti-spam policy in the Microsoft Defender 365 portal. These configuration items are created with the same name,
- A spam filter policy contains the spam protection options to enable, actions to take (move to junk, quarantine, etc.), and the custom blocked senders and sender domains.
- A spam filter rule specifies the policy’s target recipients (users, groups, accepted domains).
Creating the sender and domain block list has two high-level steps.
- Create a new spam filter policy using the New-HostedContentFilterPolicy cmdlet.
- Create and associate a new spam filter rule with the filter policy using the New-HostedContentFilterRule cmdlet.
To create a new policy, use the following code as a template:
- Name: The spam filter policy name.
- BlockedSenders: The collection of email addresses to block. Messages from these sender addresses will be marked as “High confidence spam.”
- BlockedSenderDomains: The collection of sender domains to block. Messages from these sender domains will be marked as “High confidence spam.”
- HighConfidenceSpamAction: The action to take for blocked senders’ addresses and domains. In this example, the action is to Quarantine. Refer to this link to see the other valid actions.
$customSpamPolicy = @{

Name = 'Custom Block List'

BlockedSenders = @(

'mailer365@poshlab.xyz',

'dummy@org870b.ga'

)

BlockedSenderDomains = @(

'gmail.com',

'yahoo.com'

)

HighConfidenceSpamAction = 'Quarantine'

}

New-HostedContentFilterPolicy @customSpamPolicy - The screenshot below shows the result of a successful spam filter policy creation.
Once the spam filter policy is created, the next step is to create the spam filter rule and associate it with the spam filter policy.
The below example creates the spam filter rule named “Custom Block List”, associates it with the spam filter policy named “Custom Block List”, and applies it only to recipients in the “lazyexchangeadmin.cyou” accepted domain.
New-HostedContentFilterRule -Name "Custom Block List" -HostedContentFilterPolicy 'Custom Block List' -RecipientDomainIs 'lazyexchangeadmin.cyou'
Note:
- You can specify a different name for the spam filter rule. But giving it the same name as the associated spam filter policy makes it more organized and mimics the behavior when creating a spam filter policy in the Microsoft Defender 365 portal.
- You can specify multiple accepted domains in the -RecipientDomainIs parameter. For example, -RecipientDomainIs ‘domain1.com’,’domain2.com’.
- To specify individual recipients, use the -SentTo parameter and provide the collection of recipients.
- The values can be any of the following identifiers: Name, Alias, Distinguished name (DN), Canonical DN, Email address, GUID.
- To specify group recipients, use the -SentToMemberOf parameter and provide the collection of groups.
- The accepted group types are: Distribution groups, Mail-enabled security groups, and Microsoft 365 Groups.
- The values can be any of the following identifiers: Name, Alias, Distinguished name (DN), Canonical DN, Email address, GUID.
The screenshot below shows the result of a successful spam content filter rule.
Testing and Confirmation
The messages sent by the blocked sender domain and address are marked as High Confidence Spam. This SCL rating is not adjustable. The action against high-confidence spam messages depends on the action you defined in the policy.
To test, you can send an email from a blocked sender domain and confirm that the action taken was Quarantine. The screenshot below shows the message trace result.
And this one shows the message details in the Explorer.
Exchange Online Mail Flow Rule
One more organizational configuration item to block domains or email addresses in Office 365 is the Exchange Online Mail Flow Rule.
Using the Exchange Admin Center
- Log in to the Exchange admin center.
- Navigate to Mail flow → Rules.
- On the Rules page, click Add a rule.
- Select the “Restrict messages by sender or recipient” on the dropdown.
- On the Set rule conditions page, complete the following:
- Name: “Block Sender Domain”
- Apply this rule if: “The sender”, “domain is”
- Add the sender domains to block.
- Do the following: “Block the message”, “delete the message without notifying anyone”
- Click Next.
- On the “Set rule settings” page:
- Select “Enforce” as the rule mode.
- Check the “Stop processing more rules” box.
- Select “Header or envelope” under the “Match sender address in message” section.
- Customize the other settings as you see fit.
- Click Next.
- Review the settings and click Finish to create the mail flow rule.
- Once the mail flow rule is created, click it from the Rules list and toggle the switch to Enabled.
Using Exchange Online PowerShell
In the previous example, we created a mail flow rule to block sender domains using the Exchange admin center. In this example, we’ll create another mail flow rule to block a collection of individual sender addresses.
To create the mail flow rule, use the following code as a template.
- Name: The mail flow rule name.
- FromAddressContainsWords: The collection of sender email addresses to block.
- SenderAddressLocation: The location of the sender email addresses to match. Valid values are Header, Envelope, and HeaderOrEnvelope.
- StopRuleProcessing: Specifies whether to stop processing subsequent rules.
- DeleteMessage: Specifies whether to delete the message without notifying anyone.
- Enabled: Specifies whether to enable the rule.
$mailFlowRule = @{
Name = 'Block Sender Address'
FromAddressContainsWords = @(
'mailer365@poshlab.xyz',
'dummy@org870b.ga'
)
SenderAddressLocation = 'HeaderOrEnvelope'
StopRuleProcessing = $true
DeleteMessage = $true
Enabled = $true
}
New-TransportRule @mailFlowRule
Testing and Confirmation
Send an email from a blocked sender domain or address and run a message trace. Confirm that the message was blocked because of the mail flow rule.
Outlook Blocked Senders List
Suppose only a few users need to block certain sender domains or addresses. In this case, using the Outlook Blocked Senders list is sufficient. This method can be performed primarily by the users themselves or by administrators.
Using the Outlook Desktop Client
- Click the Home tab in Outlook.
- Click Junk → June E-mail Options.
- Click the Blocked Senders tab → Add.
- Type the email address or domain to block and click OK.
- Repeat step 4 to add more entries as needed.
- Finally, click OK to save the Blocked Senders list.
Using the Outlook Web App
- Log in to your Outlook Web App.
- Click Settings → Mail → Junk email.
- Under the “Block senders and domain”, click Add.
- Enter the sender address or domains you wish to block.
- Repeat step 4 to add more entries as needed.
- Click Save.
Using Exchange Online PowerShell (As an Administrator)
As an administrator, you can set the blocked senders and domains on a user’s mailbox. To do so, use the following code as a template.
- Identity: The unique identifier of the mailbox.
- BlockedSendersAndDomains: The collection of individual sender addresses or domains to block.
$outlookBlockedSenders = @{
Identity = 'june@lazyexchangeadmin.cyou'
BlockedSendersAndDomains = @(
'gmail.com',
'mailer365@poshlab.xyz'
)
}
Set-MailboxJunkEmailConfiguration @outlookBlockedSenders
No output means no errors.
To list the block senders, run this command. Replace the -Identity parameter value with the mailbox identity.
Get-MailboxJunkEmailConfiguration -Identity 'june@lazyexchangeadmin.cyou'
This is the proper method to add more entries to the BlockedSendersAndDomains property.
# Store the current junk email configuration.
$junkConfig = Get-MailboxJunkEmailConfiguration -Identity 'june@lazyexchangeadmin.cyou'

# Create the additional blocked senders and domain collection.
$addtlBlockedSenders = @(
'org870b.ga',
'someone@contoso.com'
)

# Add the new blocked senders collection to the current blocked sender list.
$junkConfig.BlockedSendersAndDomains += $addtlBlockedSenders

# Update the BlockedSendersAndDomains
Set-MailboxJunkEmailConfiguration -Identity 'june@lazyexchangeadmin.cyou' -BlockedSendersAndDomains $junkConfig.BlockedSendersAndDomains
This way, the current blocked senders list does not get overwritten.
Messages from these sender domains and addresses will be moved to the Junk E-Mail folder in the user’s mailbox.
Conclusion
Thank you for staying until the end. We’ve explored the different ways to block domains and email addresses in Office 365 in order of their precedence. We showed you how to accomplish this task using the Tenant Allow/Block List, Anti-Spam Policy, Mail Flow Rules, and Outlook Blocked Senders List.
Blocking domains and email addresses in Office 365 must be carefully executed, especially on the organizational level. Incorrect rules and policies can lead to unintended disruption to the email flow to your users, which can result in potential data and financial loss.
Before fully implementing them in your live environment, remember to test your blocked sender list, rules, and policies. Good luck!




 Note. You can add up to 1000 entries in the block list.


3 comments
strange, it’s not deleting the address I entered in the list, still just sending it to Junk. It is configured to delete a specified address but our end user is still receiving it in his Junk folder.
Explained well. Thanks.
I’m familiar with blocking a full domain name (@example.com) in Office 365 and use it quite often. Before I take the full leap to using white-lists instead of black-lists, I’d like to try blocking most robo-emails who append random characters after the primary name (@examplekgclddd.com). Is it possible to block a partial domain name (@example) to accomplish this?