Knowing what programs are installed on your computer is helpful in many scenarios. From simply doing an inventory, troubleshooting, and removing unused or unwanted applications, there are many ways to list installed programs on Windows.
In this simple guide, we will show you a few different ways to get a list of installed programs in the recent Windows operating system version, such as Windows 10 and 11.
Table of Contents
Using Programs and Features in the Control Panel
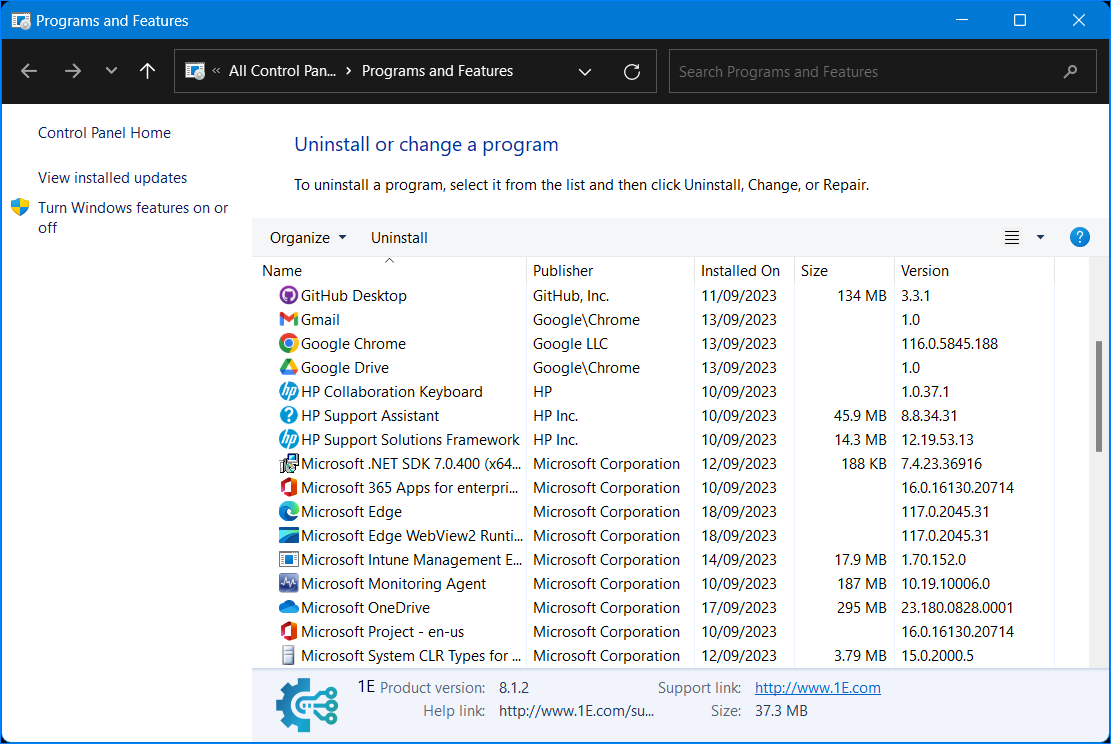
Probably the most familiar tool to find the installed programs on a computer is the Programs and Features Control Panel applet. This tool has been around even in the earlier versions of Windows.
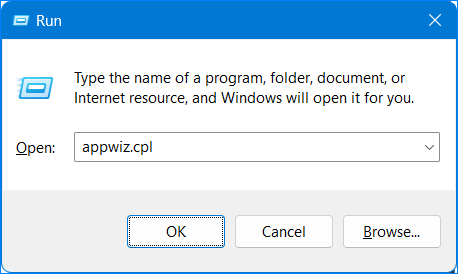
To open the Program and Features window, press WIN+R to open the Run dialog box and run appwiz.cpl.
And the Programs and Features window appears. You can now view the list of installed programs.
This applet hasn’t had any significant updates. Sadly, it also doesn’t let you export the list of installed programs.
Using the Shell:AppsFolder System Folder
Another quick way to show all installed programs is by opening the Shell:AppsFolder. But don’t let the name fool you. It is not an actual folder on your computer. Instead, it is a special system folder (virtual) that conveniently lists shortcuts to installed programs.
To open, press WIN+R to open the Run dialog box and run Shell:AppsFolder.
A typical File Explorer window shows up that opens the virtual Applications folder.
On the bottom-left corner, you can find the total number of installed apps in Windows. This number includes all the default Windows utilities, such as Control Panel, Disk Cleanup, Cortana, etc.
As convenient as it is, this folder view does not let you export the list of installed applications to a file.
Using the Windows Settings Apps & Features
The Windows Settings Apps & Features have been available since Windows 8, the more modern counterpart of the Programs and Features in Control Panel.
To open it, press WIN+X or right-click on Start and click Installed Apps (Windows 11) or Apps and Features (Windows 10).
Alternatively, press WIN+R to open the Run dialog box and run ms-settings:appsfeatures.
And you now have a full view of the “Installed apps.”
The primary purpose of this feature is to show the installed apps and uninstall them as needed. But it also doesn’t let you export the list of installed programs.
Using the WMIC Command Line Tool
The Windows Management Instrumentation (WMI) is a handy feature that lets you query a plethora of information on local and remote computers. The primordial tool to query the WMI is the wmic command, built-in to Windows.
To use wmic, open an elevated command prompt (as admin) and run the following command:
wmic product get name,version
This command returns a table showing the name and version of the installed programs.
Since wmic rides on the WMI backbone, it also allows you to query the same information from a remote machine. To do so, use the /node:computer switch, where the computer is the remote host.
wmic /NODE:"JENKINS" product get name,version
Even better, wmic lets you format a list to a CSV.
wmic product get name,version /FORMAT:CSV
This allows you to export the output to a CSV file using the standard redirector (>) operator.
If the CSV report seems too basic for you, perhaps you can export the list of installed programs in an HTML report instead.
wmic /output:c:\temp\InstalledApps.htm product get Name,Version,Vendor /format:htable
WMI is awesome. But it’s not perfect. One of its pain points is performance. It’s so slow. So let’s jump ahead and see what else we can use.
Using PowerShell to Query the Uninstall Registry
PowerShell has a Registry provider that exposes the HKEY_LOCAL_MACHINE and HKEY_CURRENT_USER hives. You can interact with the registry as though they are items in a drive.
Using the Get-Item cmdlet, we can retrieve the list of installed programs from these registry paths:
- ‘HKLM:\Software\Wow6432Node\Microsoft\Windows\CurrentVersion\Uninstall\*’ – 32bit applications.
- ‘HKLM:\Software\Microsoft\Windows\CurrentVersion\Uninstall\*’ – 64bit applications.
Run the below command in an elevated PowerShell session. This command gets the
## List 32bit installed programs
$regPath = 'HKLM:\Software\Wow6432Node\Microsoft\Windows\CurrentVersion\Uninstall\*'
Get-ItemProperty -Path $regPath |
Select-Object DisplayName, DisplayVersion, Publisher, InstallDate
## List 64bit installed programs
$regPath = ‘HKLM:\Software\Microsoft\Windows\CurrentVersion\Uninstall\*’
Get-ItemProperty -Path $regPath |
Select-Object DisplayName, DisplayVersion, Publisher, InstallDate
The result below shows the installed program information.
And since you’re working with PowerShell, you can export this report to CSV, XML, HTML, JSON, and others.
Using the PowerShell Get-Package Cmdlet
On Windows Server 2022, Windows 10, and Windows 11, you can use three built-in PowerShell provider Programs, msu, and msi. Note that these providers are only available in Windows PowerShell by default.
To list existing provides, you can run the Get-PackageProviders cmdlet, as shown below.
To list all packages, run the Get-Package cmdlet without parameters. As you can see, the command returned desktop apps, installed via MSI packages, installed Windows Security Updates (MSU), available PowerShell modules (installed from PSGallery), and Microsoft Store apps.
You can limit the results by specifying which provider to use. You can use one or more providers in the same command.
Get-Package -ProviderName Programs,msi
If PowerShell remoting (WinRM) is enabled, you can query remote machines by running the cmdlet inside the script block of the Invoke-Command cmdlet.
Invoke-Command -ComputerName REMOTE_COMPUTER -ScriptBlock {Get-Package -ProviderName Programs}
Using the PowerShell Get-AppxPackage Cmdlet
The Get-AppxPackage cmdlet is designed to list Windows Apps installed on the computer.
To generate a list of Universal Windows Platform (UWP) apps (formerly Windows Store apps and Metro-style apps) for the current user, run the following command:
# Current user
Get-AppxPackage | Select-Object Name, Version
# All users
Get-AppxPackage -AllUsers | Select-Object Name, Version
Using NirSoft UninstallView
Stepping into third-party territory, the NirSoft UninstallView is a free, small utility that graphically displays all installed programs on your computer. It is available in 32-bit and 64-bit versions and does not require installation.
Once you downloaded the tool, extract the ZIP archive and run the UninstallView.exe file. The UninstallView window shows up with the list of installed programs.
The default view does not show the system components and Windows apps (from the Microsoft Store). But you can enable to show those items by clicking Options and choosing which items to reveal.
It has a built-in option to save the report to text and HTML files.
Below is a sample HTML report.
Using RevoUninstaller
Our last third-party tool in the list is the RevoUninstaller. It has a freeware version that is sufficient for regular and power users.
You can download the portable version or the installer. Whichever one you choose will give you the same version of the tool.
The Uninstaller view shows the classic desktop applications installed.
On the other hand, the Windows Apps view shows all Windows Apps installed (from the Microsoft Store.)
Right-click any item in the list, and you can export the list to a text or HTML file.
You can even choose which columns to include in the report.
Below is a sample of an HTML report generated by RevoUninstaller.
Bonus: PowerShell Script to Get a List of Installed Programs
This PowerShell script uses the Windows registry entries to retrieve details about installed programs on one or more local/remote computers.
Copy the code and save it to your computer as Get-InstalledApps.ps1. You can also download the script from this Gist.
[CmdletBinding()]
param (
[parameter()]
[switch]$Credential,
[parameter(ValueFromPipeline = $true)]
[String[]]$ComputerName = $env:COMPUTERNAME
)
begin {
$key = “SOFTWARE\Microsoft\Windows\CurrentVersion\Uninstall\”
}
process {
$ComputerName | ForEach-Object {
$Comp = $_
if (!$Credential) {
$reg = [microsoft.win32.registrykey]::OpenRemoteBaseKey(‘Localmachine’, $Comp)
$regkey = $reg.OpenSubKey([regex]::Escape($key))
$SubKeys = $regkey.GetSubKeyNames()
Foreach ($i in $SubKeys) {
$NewSubKey = [regex]::Escape($key) + “” + $i
$ReadUninstall = $reg.OpenSubKey($NewSubKey)
$DisplayName = $ReadUninstall.GetValue(“DisplayName”)
$Date = $ReadUninstall.GetValue(“InstallDate”)
$Publ = $ReadUninstall.GetValue(“Publisher”)
New-Object PsObject -Property @{“Name” = $DisplayName; “Date” = $Date; “Publisher” = $Publ; “Computer” = $Comp } | Where-Object { $_.Name }
}
}
else {
$Cred = Get-Credential
$connect = New-Object System.Management.ConnectionOptions
$connect.UserName = $Cred.GetNetworkCredential().UserName
$connect.Password = $Cred.GetNetworkCredential().Password
$scope = New-Object System.Management.ManagementScope(“$Comprootdefault”, $connect)
$path = New-Object System.Management.ManagementPath(“StdRegProv”)
$reg = New-Object System.Management.ManagementClass($scope, $path, $null)
$inputParams = $reg.GetMethodParameters(“EnumKey”)
$inputParams.sSubKeyName = $key
$outputParams = $reg.InvokeMethod(“EnumKey”, $inputParams, $null)
foreach ($i in $outputParams.sNames) {
$inputParams = $reg.GetMethodParameters(“GetStringValue”)
$inputParams.sSubKeyName = $key + $i
$temp = “DisplayName”, “InstallDate”, “Publisher” | ForEach-Object {
$inputParams.sValueName = $_
$outputParams = $reg.InvokeMethod(“GetStringValue”, $inputParams, $null)
$outputParams.sValue
}
New-Object PsObject -Property @{“Name” = $temp[0]; “Date” = $temp[1]; “Publisher” = $temp[2]; “Computer” = $Comp } | Where-Object { $_.Name }
}
}
}
}
Once you’ve saved the script, open PowerShell and change the working directory to the script location.
Related. Navigating the Filesystem with PowerShell Change Directory commands.
Push-Location <path_to_script>
Execute the script without parameters to get the list of installed apps on the local computer.
.\Get-InstalledApps.ps1
To get lists of installed software from one or more computers (local and remote), specify the -ComputerName parameter followed by the computer names.
.\Get-InstalledApps.ps1 -ComputerName Jenkins
Conclusion
We’ve discussed several methods to get a list of installed programs on Windows. We used the classic Control Panel applet, the virtual Application folder, the wmic command, the modern Windows Settings, and some PowerShell commands and scripts.
We also explored the UninstallView from NirSoft and RevoUninstallers. both of which are free third-party tools.
Thank you for reading this post, and we hope you learned something new today!


6 comments
the wmic/ciminstance stuff is reliable but it’s also extremely slow. give get-package a try.
@Daniel Reynolds thanks for the tip about the uninstall
I had to fix this line
begin {$key = “SOFTWARE\Microsoft\Windows\CurrentVersion\Uninstall”}
to be
begin {$key = “SOFTWARE\Microsoft\Windows\CurrentVersion\Uninstall\”}
and then it worked.
Also I was able to substitute “Displayversion” for “InstalledDate” to get the versions of the software installed which was helpful for me.
How do I get WhatsApp installed on this computer
you need to install it
Awesome!
You’ve providing well explanation and solution for this issue.
Quick way to see all installed applications…
Open the Command Menu WINDOWS KEY + X
Select “Apps and Features”
In the right column select “Programs and Features”