Amazon Simple Storage Service (S3) is a popular storage solution provided by Amazon Web Services (AWS) that allows users to store and retrieve large amounts of data. When using S3, it’s essential to ensure that access to your S3 buckets is properly controlled to maintain the security and privacy of your data.
One way to achieve this is by using AWS S3 Bucket Policy. In this blog post, we will explore how to control access to S3 buckets using group-based and resource-based S3 bucket policies.
Table of Contents
Create a Bucket without Public Access
Before setting up access controls, let’s start by creating an S3 bucket without public access. By default, when you create an S3 bucket, it’s private and inaccessible to the public. However, verifying that your bucket has no public access configurations is crucial. To create a private bucket, follow these steps:
- Log in to your AWS Management Console using your root user.
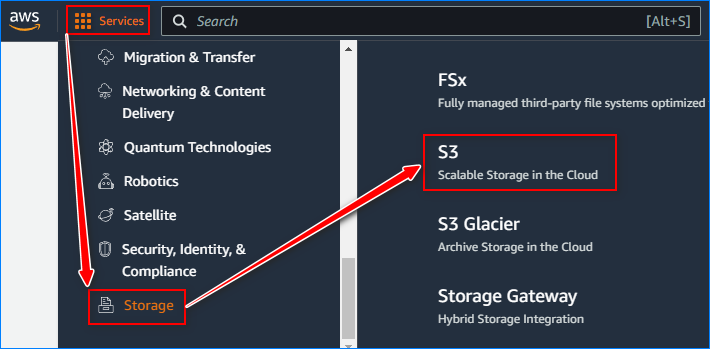
- Navigate to the Amazon S3 service.
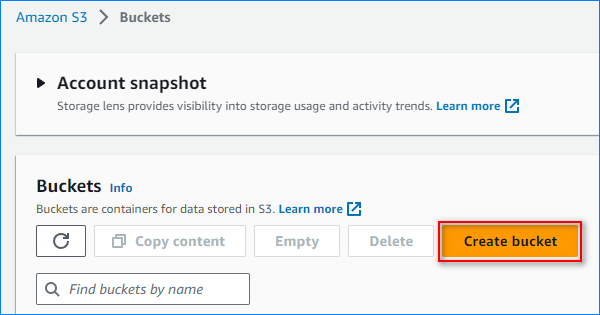
- Click on the “Create bucket” button.
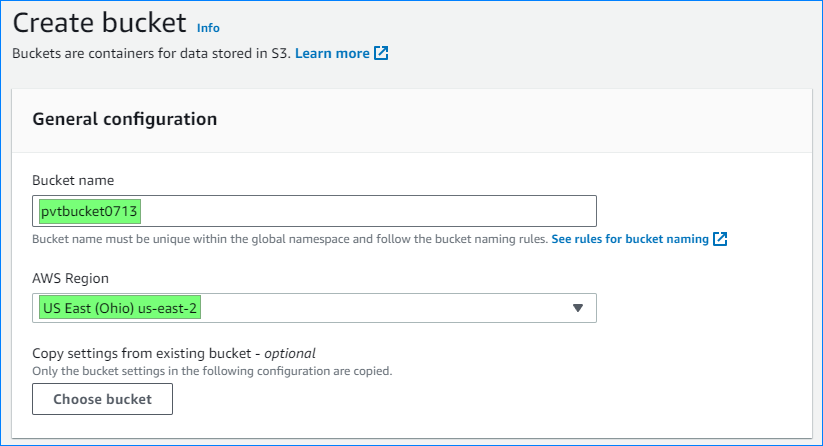
- Provide a unique bucket name and select the AWS region.
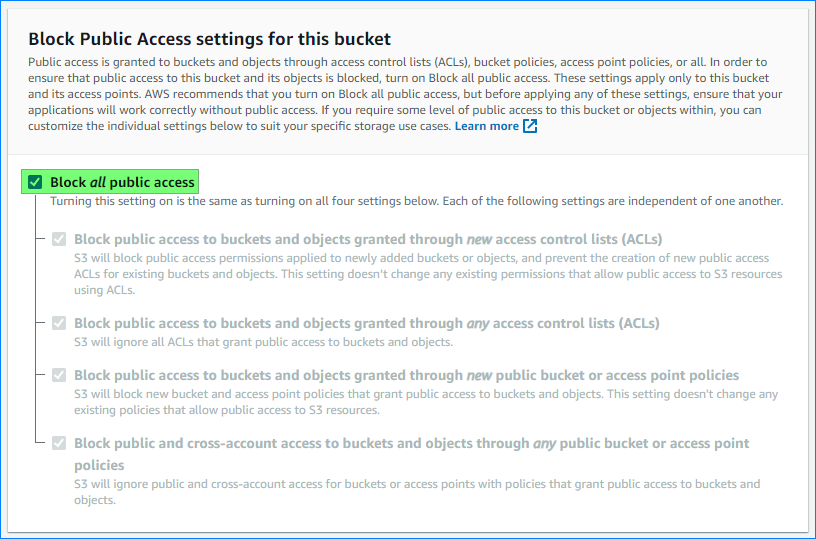
- Leave all the default settings intact, ensuring that “Block all public access” is enabled.
- Complete the bucket creation process by clicking the “Create bucket” button.
With this setup, we have a private S3 bucket, ensuring that unauthorized users cannot access its contents.
Create an IAM User with No Permissions
To demonstrate the effectiveness of S3 bucket policies in controlling access, let’s create an IAM user with no permissions. IAM (Identity and Access Management) is a service provided by AWS that allows you to manage user access to various AWS resources.
By creating a user with no permissions, we can show how S3 bucket policies override IAM permissions to grant access to specific resources.
To create an IAM user with no permissions, follow these steps:
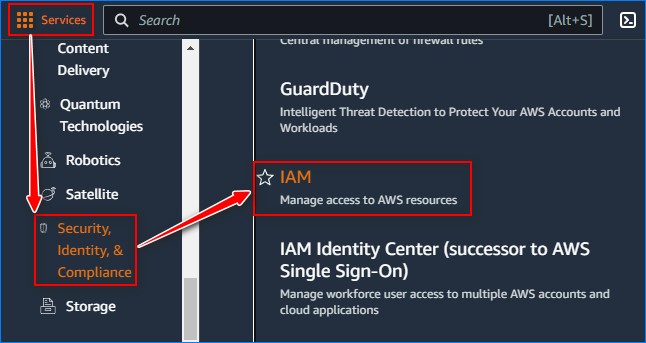
- Navigate to the IAM service in the AWS Management Console.
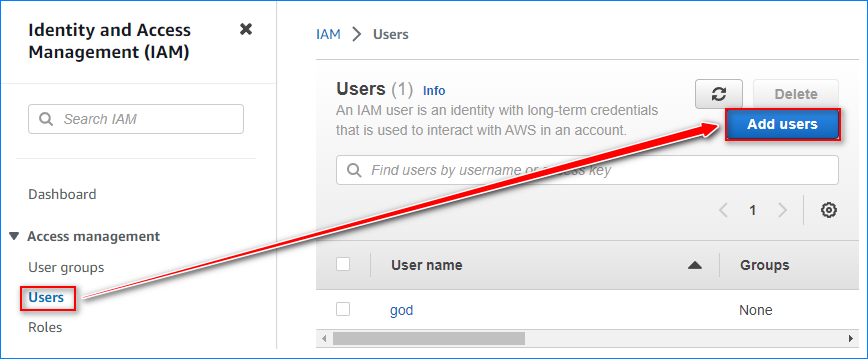
- Click on “Users” and then “Add users.”
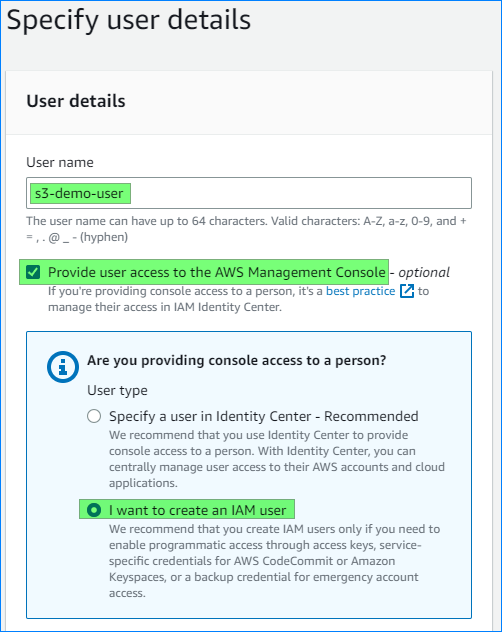
- Provide a name for the user, check the “Provide user access to the AWS Management Console” box, and select the “I want to create an IAM user” option as the user type.
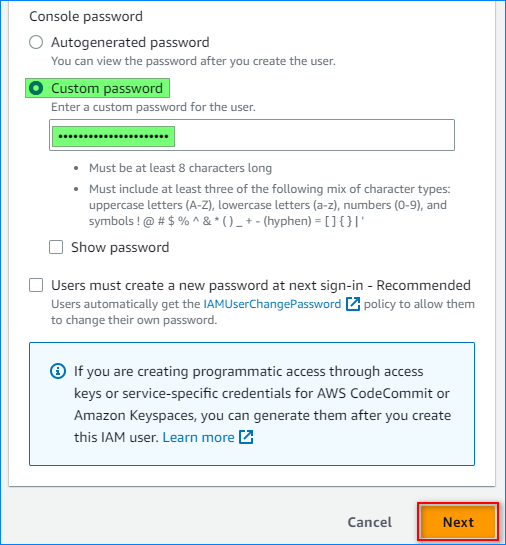
- Specify the custom password and click Next.
- Skip the permissions configuration step and click Next.
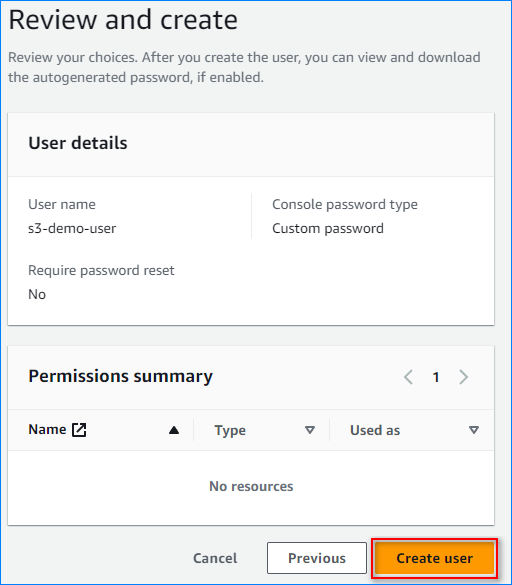
- Click “Create user” under the “Review and create” step.
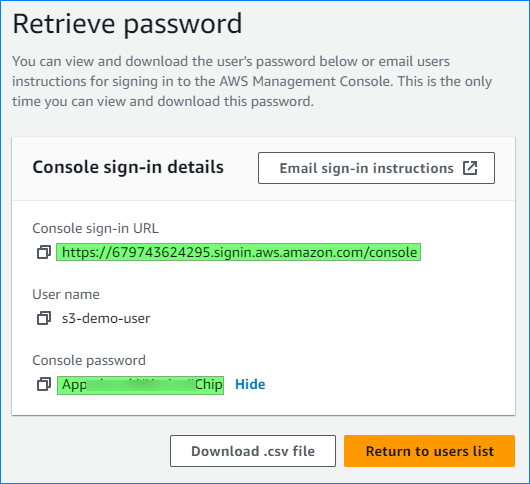
- Once the user is created, note down the Console sign-in URL and Console password. We will use these credentials to test the bucket policies later.
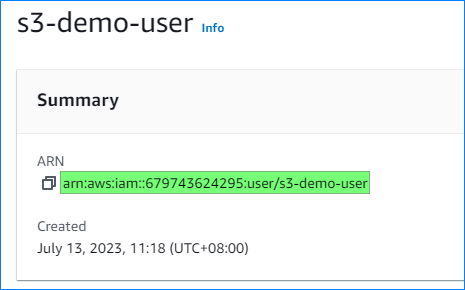
- Also, note down the IAM user’s ARN. You will need this when assigning the S3 bucket policy.
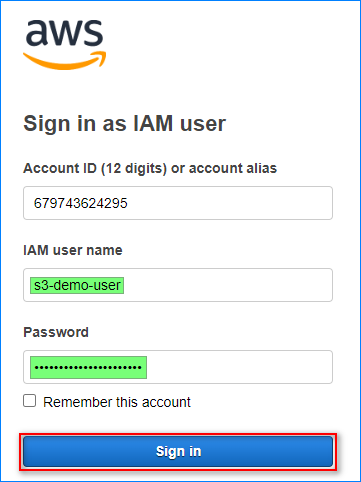
- Open a new private or incognito tab on your browser and navigate to the Console sign-in URL in the previous step.
- Log in as the IAM user by entering the IAM username and password. The Account ID is already pre-populated.
- Navigate to the S3 buckets, and you will see a red banner saying, “You don’t have permissions to list buckets.”
This message confirms that the S3 bucket is private, and no one else can access it but the user who created it.
Method 1: Group-Based S3 Bucket Policy (IAM)
Assigning permissions through policies is more manageable with groups instead of per user. However, you cannot directly apply an S3 bucket policy to a group because a group is not categorized as a principal.
To implement a group-based S3 bucket policy, we must create a group and an inline custom policy attached to it.
Create an IAM User Group
In this example, we’ll create a group called s3-demo-group. The s3-demo-user IAM user will be a member of this group.
- In the IAM console, click User groups → Create group.
- Enter the group name, select the users to add, and click Create group.
Create an Inline S3 Bucket Policy to See List of Buckets
Once the group is created, let’s create an inline policy to allow its members to list the S3 buckets.
- Click the new group you created.
- Click Permissions → Add permissions → Create inline policy.
- Click the JSON button to show the JSON editor, and paste the following code:
{ "Version": "2012-10-17", "Statement": [ { "Sid": "AllowListMyBuckets", "Effect": "Allow", "Action": "s3:ListAllMyBuckets", "Resource": "*" } ] } - Click Next.
- Enter the policy name and click Create policy.
The policy has been created.
- Switch back to your IAM user and navigate to the S3 buckets console. The IAM user can now list the S3 buckets. You’ll see that the user has “Insufficient permissions”, which is expected.
Create an Inline S3 Bucket Policy with Read and Write Permissions
In this step, we’ll create another inline S3 bucket policy that allows users to read and write to the S3 bucket and its objects.
- Click Permissions → Add permissions → Create inline policy.
- Click the JSON button to show the JSON editor, and paste the following code:
{ "Version": "2012-10-17", "Statement": [ { "Sid": "AllowReadWrite", "Effect": "Allow", "Action": [ "s3:PutObject", "s3:GetObjectAcl", "s3:GetObject", "s3:ListBucket", "s3:PutObjectAcl" ], "Resource": [ "arn:aws:s3:::pvtbucket0713", "arn:aws:s3:::pvtbucket0713/*" ] } ] } - Replace pvtbucket0713 with your S3 bucket name and click Next.
- Enter the policy name and click Create policy.
The inline S3 bucket policy has been created.
Method 2: Resource-Based S3 Bucket Policy
This method will create the S3 bucket policy directly on the S3 bucket, not as an IAM policy. Bucket policies only accept valid principals, which means groups cannot be used for resource-based permissions.
Assign ListMyBuckets Permission to the IAM User
- On the IAM console, select the IAM user.
- Click Permissions → Add permissions → Create inline policy.
- Click JSON to open the JSON policy editor and paste the following code:
{ "Version": "2012-10-17", "Statement": [ { "Sid": "AllowListAllMyBuckets", "Effect": "Allow", "Action": "s3:ListAllMyBuckets", "Resource": "*" } ] } - After pasting the code, click Next.
- Enter the policy name and click Create policy.
You’ve now added the ListAllMyBuckets permission to the IAM user.
Add a Resource-Based S3 Bucket Policy with Read and Write Permissions
- Navigate to the S3 console, select the S3 bucket, and click Permissions.
- Scroll down to the Bucket policy section, and click Edit.
- Paste the following code into the policy editor. This policy permits the IAM user to list the bucket and its objects and read and write objects.
{ "Version": "2012-10-17", "Statement": [ { "Sid": "AllowListReadWrite", "Principal": { "AWS": "arn:aws:iam::679743624295:user/s3-demo-user" }, "Effect": "Allow", "Action": [ "s3:ListBucket", "s3:GetObject", "s3:GetObjectAcl", "s3:PutObject", "s3:PutObjectAcl" ], "Resource": [ "arn:aws:s3:::pvtbucket0713", "arn:aws:s3:::pvtbucket0713/*" ] } ] } - Replace “arn:aws:iam::679743624295:user/s3-demo-user” with your IAM user’s ARN.
- Replace pvtbucket0713 with your S3 bucket name.
- Scroll to the bottom and click Save changes.
The new S3 bucket policy will be saved successfully if all goes well.
Test the S3 Bucket Policy
Switch back to your IAM user, navigate to the S3 buckets console, and open the S3 bucket. As expected, the bucket has no objects yet.
- As expected, the bucket has no objects yet. Click Upload.
- Drag and drop files or click Add files or Add folder.
- Once you’ve added all files and folders, click Upload.
- If all goes well, the file will be uploaded, and you’ll see a confirmation similar to the screenshot below. Click Close.
You’ve successfully uploaded a file with permissions from the S3 bucket policy.
Conclusion
Controlling access to your S3 buckets is a crucial aspect of maintaining the security and integrity of your data. AWS S3 bucket policies provide a powerful mechanism to control access and override IAM permissions when necessary.
By leveraging group-based inline S3 bucket policies or resource-based S3 bucket policies, you can enforce granular access controls and ensure only authorized entities can interact with your S3 buckets.
Regularly review and update your access policies as your requirements evolve to keep your data safe and secure.

 With this setup, we have a private S3 bucket, ensuring that unauthorized users cannot access its contents.
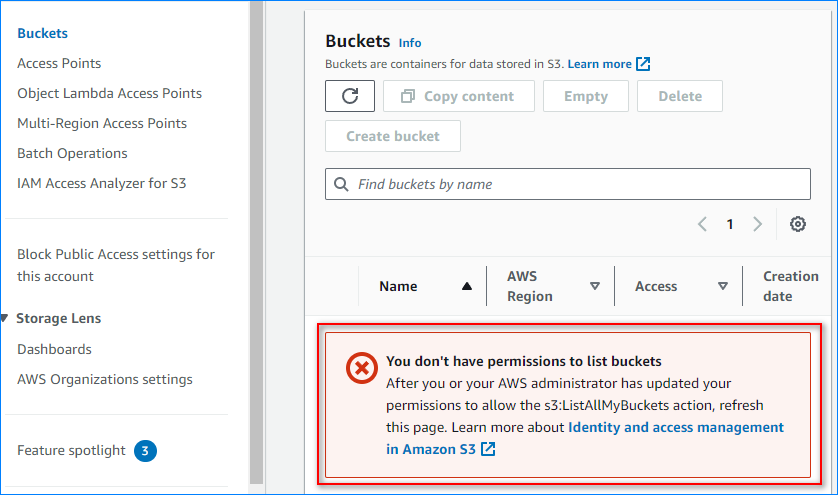 This message confirms that the S3 bucket is private, and no one else can access it but the user who created it.


 The policy has been created.


 The inline S3 bucket policy has been created.


 The new S3 bucket policy will be saved successfully if all goes well.


 You’ve successfully uploaded a file with permissions from the S3 bucket policy.