An RODC is a specialized domain controller that holds a read-only copy of the Active Directory database, providing an extra layer of security for branch offices or locations with limited physical security.
In this article, we will explore what an RODC is, its benefits, and the step-by-step process to install and configure it using both direct and staged installation methods.
Note. This tutorial uses Windows Server 2022 for demonstration, but the examples should be similar to Windows Server 2019.
Table of Contents
What is Read-Only Domain Controller (RODC)?
A Read-Only Domain Controller (RODC) is a domain controller in the Windows Server environment that stores a read-only replica of the Active Directory database. Unlike a writable domain controller, an RODC does not allow any changes to the Active Directory database from that particular domain controller.
This limitation makes it an ideal choice for scenarios where security is a significant concern, such as remote offices, branch locations, or sites with lower physical security.
The main advantages of an RODC are:
- Reduced Attack Surface: Since the RODC is read-only, even if it is compromised, an attacker cannot make changes to the Active Directory database, minimizing the potential damage.
- Credential Caching: RODCs can cache credentials of previously authenticated users, which reduces the need for users to contact a writable domain controller for authentication, thus improving logon times.
- Better Bandwidth Utilization: An RODC can help optimize the replication traffic in locations with limited bandwidth since it only receives updates but doesn’t send them out.
Method 1: Install Read-Only Domain Controller (Direct)
Installing the RODC using this method is performed by an administrator on the target server. The installation can be done using the Server Manager (GUI) and PowerShell.
Requirements
- The functional level of your domain is Windows Server 2008 or higher.
- The administrator who will install the RODC must be a member of the Domain Admins group.
- The target RODC server must meet the following:
- A configured computer name.
- Have a static IP address.
- Must be pointed to the nearest Read-Writable Domain Controller (RWDC) as its DNS server.
- Must be joined to the domain.
Using the Server Manager
In this section, we’ll install a read-only domain controller on a target server called RODC1 using the Server Manager GUI.
- Open the Server Manager on the target RODC server.
- Click Manage → Add Roles and Features.
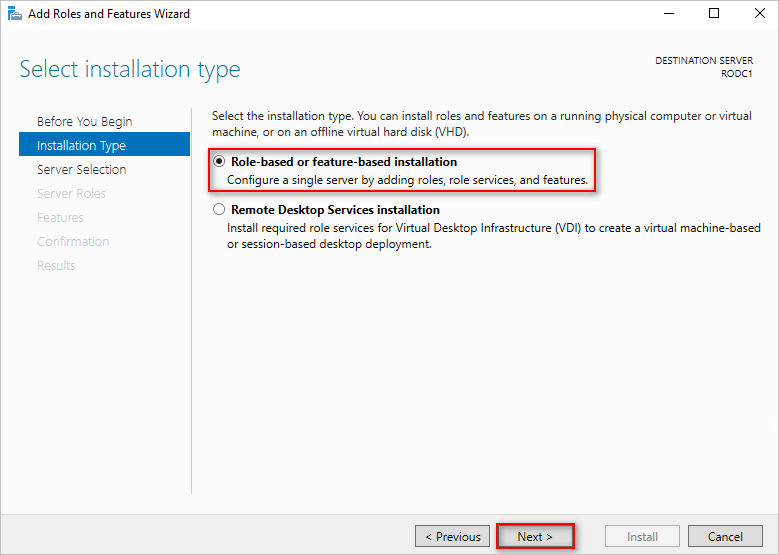
- Select the “Role-based or feature-based installation” option, and click Next.
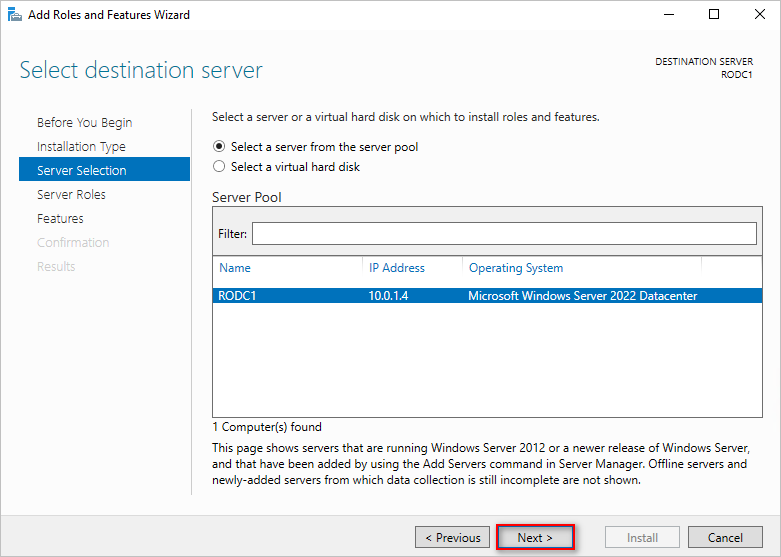
- Select the target RODC server and click Next.
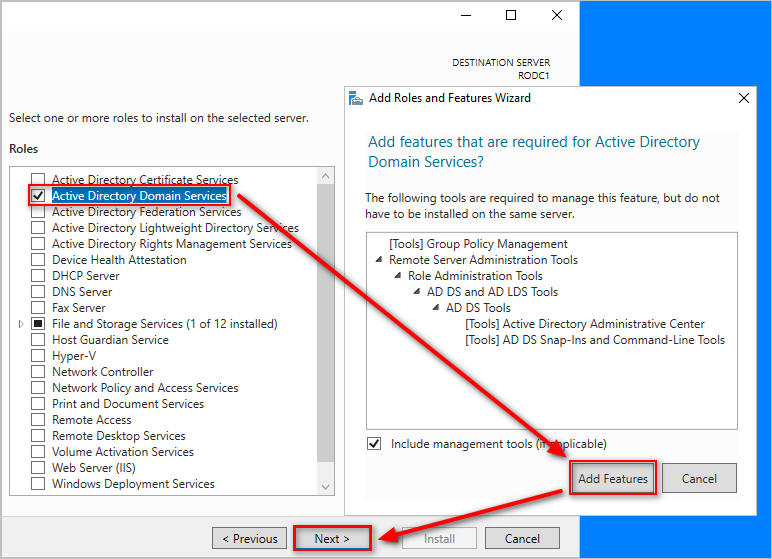
- Check the “Active Directory Domain Services” role, click Add Features and Next.
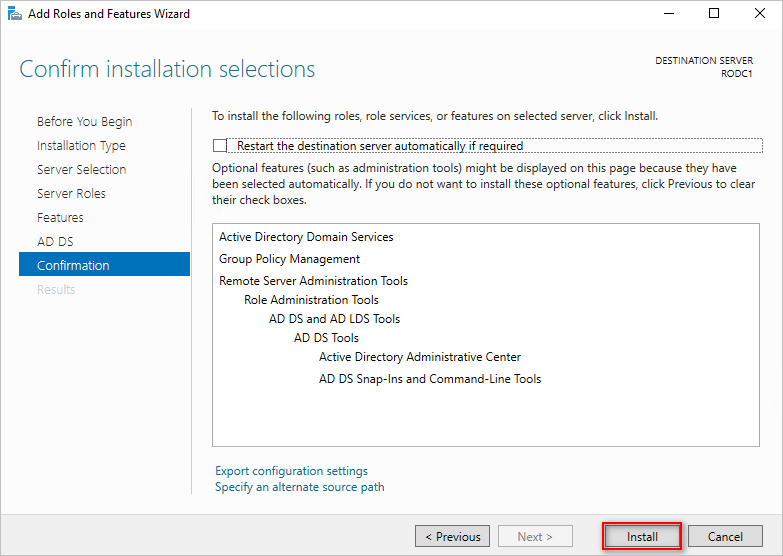
- Click Next on the following pages until you reach the Confirmation step.
- Click Install and wait for the ADDS role installation to complete.
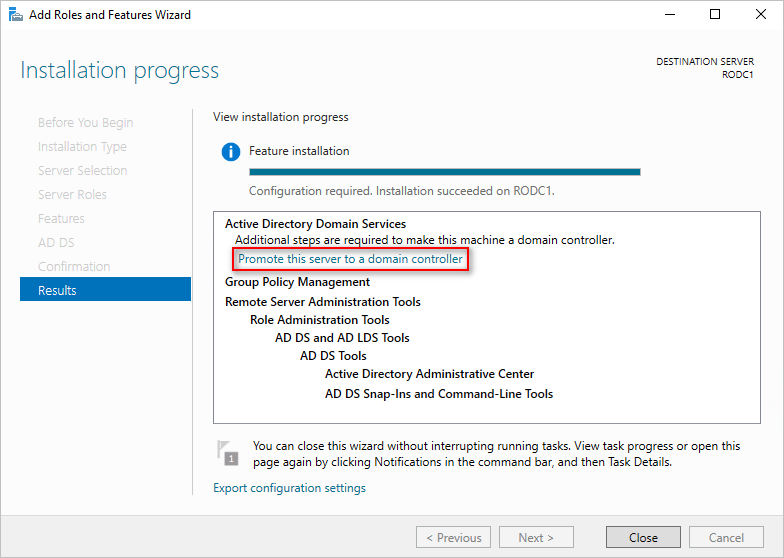
- Once the ADDS installation is finished, click the “Promote this server to a domain controller” link.
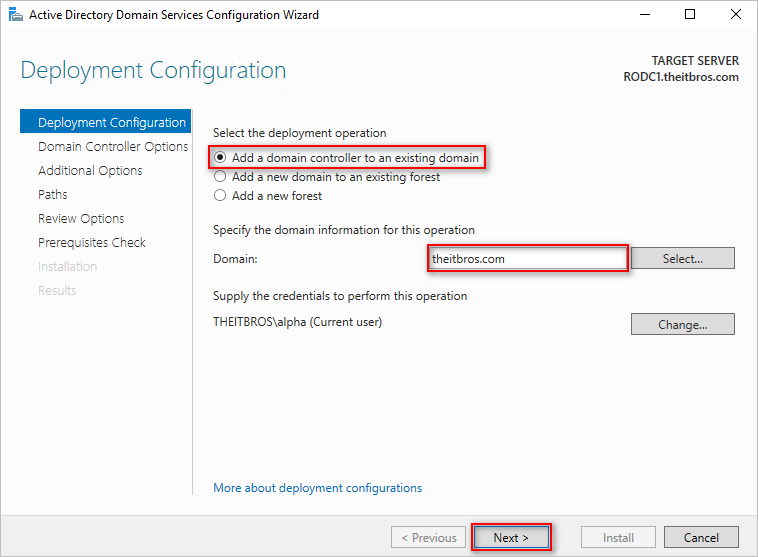
- Select the “Add a domain controller to an existing domain” option, select the correct domain, and click Next.
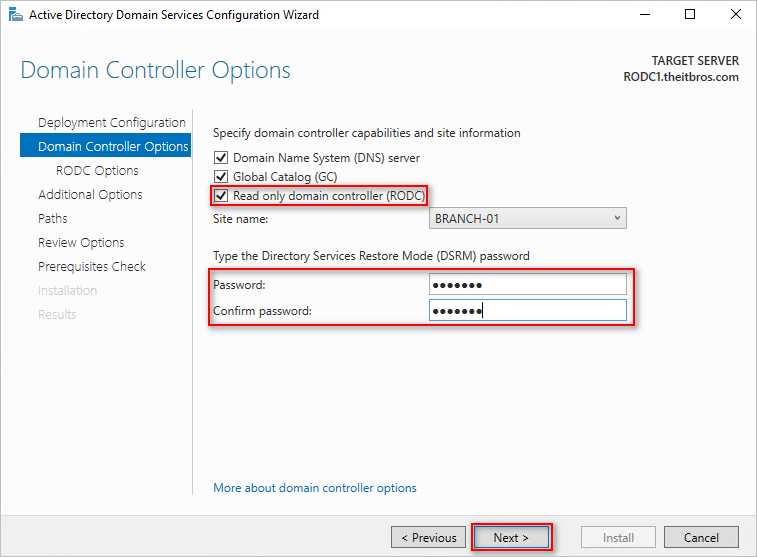
- Check the “Read only domain controller (RODC)” option, type the DSRM password, and click Next.
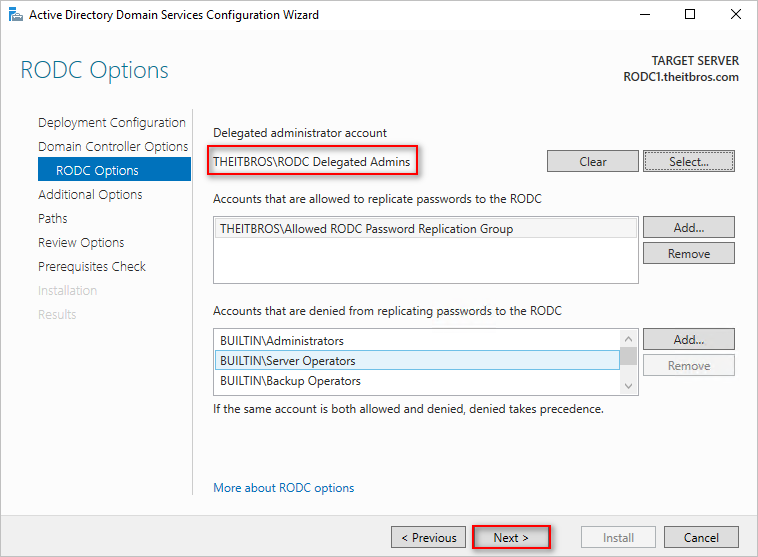
- Select the “Delegated administrator account” on the RODC options page. You can choose a user or group. In this example, I’m selecting a pre-created security group called RODC Delegated Admins. The members of this group will have local administrator-equivalent access to the RODC server.
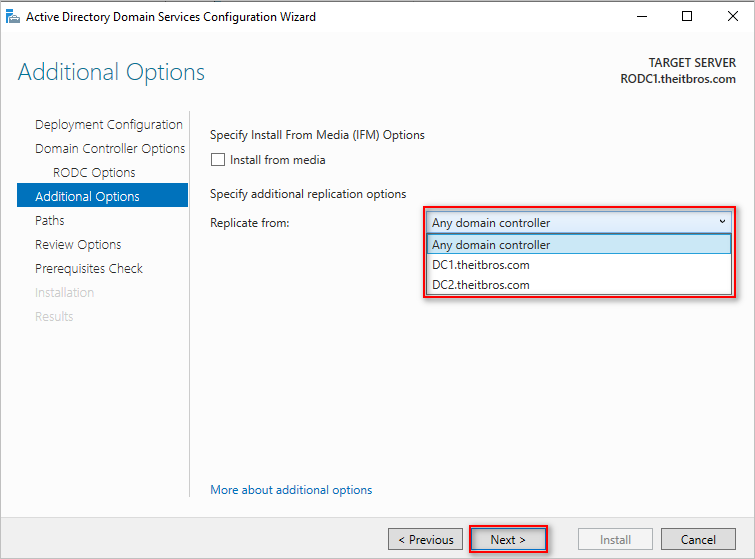
Leave other fields as default and click Next. - Choose whether to replicate from a specific domain controller or any domain controller and click Next.
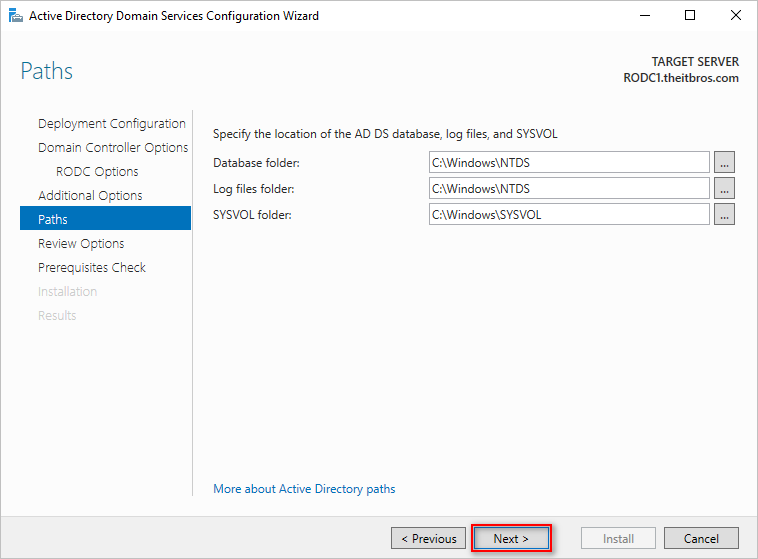
- Customize or leave the default database, log files, and SYSVOL paths and click Next.
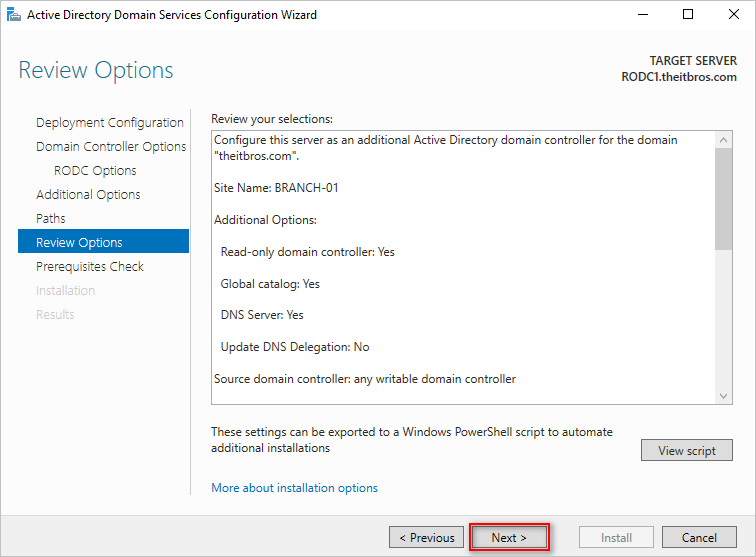
- Review the RODC installation options and click Next.
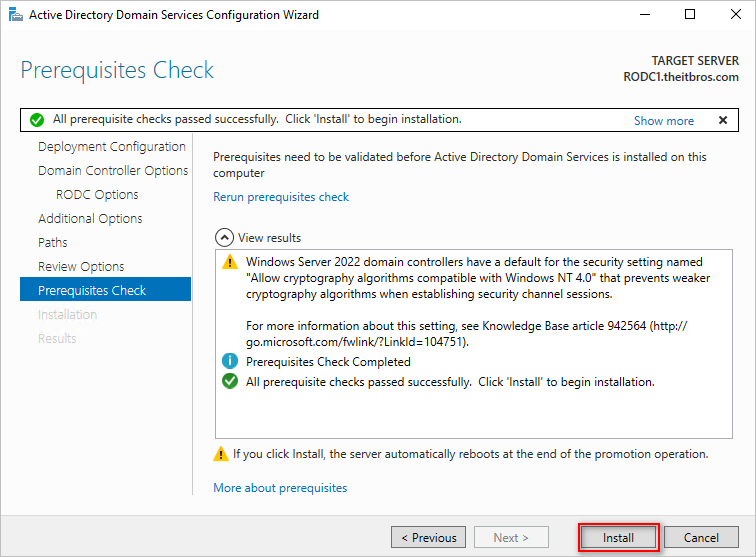
- When the prerequisites check has been completed and passed, click Install.
- Wait for the installation to complete. Once the installation is finished, the server will reboot automatically.
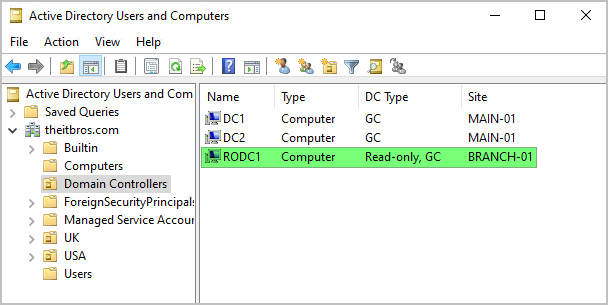
- Open the Active Directory Users and Computers console (dsa.msc), navigate to the Domain Controllers container, and see the new RODC.
Using PowerShell
In this section, we’ll install a read-only domain controller on a target server called RODC2 using PowerShell.
- Open PowerShell as an administrator on the target RODC server.
- Run the following commands to install the Active Directory Domain Services role:
# Install AD DS Role

Import-Module ServerManager

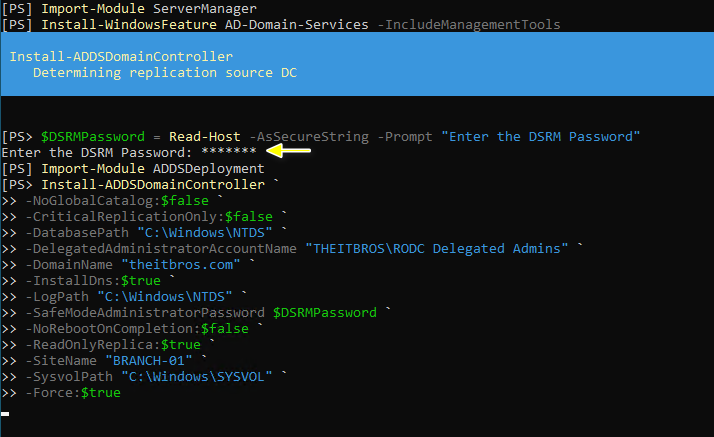
Install-WindowsFeature AD-Domain-Services -IncludeManagementTools - Run the following script to promote the domain controller. This PowerShell script installs an Active Directory Domain Controller with specific configurations, such as making it a global catalog server, setting the appropriate paths for the AD database and log files, installing DNS, setting the Safe Mode Administrator Password, making it a Read-Only Replica, specifying the Active Directory site, and forcing the installation to proceed.
The script guides the user to enter the password for DSRM at the beginning for added security.# Install the RODC
$DSRMPassword = Read-Host -AsSecureString -Prompt "Enter the DSRM Password"
Import-Module ADDSDeployment
Install-ADDSDomainController `
-NoGlobalCatalog:$false `
-CriticalReplicationOnly:$false `
-DatabasePath "C:\Windows\NTDS" `
-DelegatedAdministratorAccountName "THEITBROS\RODC Delegated Admins" `
-DomainName "theitbros.com" `
-InstallDns:$true `
-LogPath "C:\Windows\NTDS" `
-SafeModeAdministratorPassword $DSRMPassword `
-NoRebootOnCompletion:$false `
-ReadOnlyReplica:$true `
-SiteName "BRANCH-01" `
-SysvolPath "C:\Windows\SYSVOL" `
-Force:$trueLet’s break down the code step by step:
- $DSRMPassword = Read-Host -AsSecureString -Prompt “Enter the DSRM Password”
- This line prompts the user to enter a password for Directory Services Restore Mode (DSRM), a special boot mode in Active Directory used for restoring or repairing the AD database. The AsSecureString parameter ensures that the password is securely stored as a SecureString object, a more secure way to handle sensitive data like passwords.
- Import-Module ADDSDeployment
- This line imports the ADDSDeployment module, which provides cmdlets (commands) related to deploying Active Directory.
- Install-ADDSDomainController
- This is the cmdlet used to install the Active Directory Domain Controller.
- $DSRMPassword = Read-Host -AsSecureString -Prompt “Enter the DSRM Password”
- Now, let’s go through the various parameters used with the Install-ADDSDomainController cmdlet:
- NoGlobalCatalog:$false: Specifies that this domain controller will be a global catalog server. The value $false indicates that it will be a global catalog; otherwise, $true would mean it won’t be a global catalog.
- CriticalReplicationOnly:$false: Indicates whether the new domain controller should perform critical-only replication during the installation. Setting this to $false means the domain controller replicates all domain partition information.
- DatabasePath “C:\Windows\NTDS”: Specifies the path where the Active Directory database will be stored on the new domain controller. The path provided here is C:\Windows\NTDS.
- DelegatedAdministratorAccountName “THEITBROS\RODC Delegated Admins”: Sets the account name for the Delegated Administrator. This is usually used for Read-Only Domain Controllers (RODCs) to specify which group can administer them.
- DomainName “theitbros.com”: Specifies the name of the domain for which the new domain controller will be installed.
- InstallDns:$true: Specifies whether to install the DNS server role on the domain controller. Setting $true means DNS will be installed.
- LogPath “C:\Windows\NTDS”: Specifies the path where the Active Directory log files will be stored. The path provided here is C:\Windows\NTDS.
- SafeModeAdministratorPassword $DSRMPassword: Provides the password entered by the user at the beginning of the script for Directory Services Restore Mode.
- NoRebootOnCompletion:$false: Specifies whether the domain controller should automatically restart after the installation is completed. Setting $false means it will not automatically reboot.
- ReadOnlyReplica:$true: Indicates that the domain controller being installed is a Read-Only Replica. RODCs are used in branch offices and have limited functionality to enhance security.
- SiteName “BRANCH-01”: Specifies the name of the Active Directory site where the new domain controller will be located.
- SysvolPath “C:\Windows\SYSVOL”: Sets the path where the Sysvol folder (containing the domain’s public files like policies and scripts) will be stored. The path provided here is C:\Windows\SYSVOL.
- Force:$true: Forces the installation even if there might be warnings or errors. Setting $true means the cmdlet will proceed regardless of any potential issues.
Once the installation is finished, the RODC server will restart automatically.
- Run the following command in PowerShell to display the new RODC.
Get-ADDomainController <RODC SERVER> | Select-Object Hostname,IsReadOnly,IsGlobalCatalog,Site
Method 2: Install Read-Only Domain Controller (Staged)
A staged RODC installation is useful when a Domain Admin must delegate the completion of the RODC deployment. This method is done in two stages.
Stage 1:
This step is typically done in the same location as the RWDC. The Domain Admin pre-creates the domain controller computer account, which includes:
- Specifying the RODC name and site.
- Adding delegated administrators who can deploy the RODC on the new server.
Stage 2:
The delegated administrator then installs the ADDS role and promotes it to a read-only domain controller. This method avoids assigning a highly privileged account to deploy the RODC.
Requirements
- The functional level of your domain is Windows Server 2008 or higher.
- The administrator who will pre-create the RODC computer account must be a Domain Administrator.
- A delegated user or group must be prepared prior to the RODC deployment.
- The target RODC server must meet the following:
- A configured computer name.
- Have a static IP address.
- Must be pointed to the nearest Read-Writable Domain Controller (RWDC) as its DNS server.
- Must NOT be joined to the domain.
Preparation: Allow computer account re-use during domain join (GPO)
Starting with the March 14, 2023 Security update, a security restriction disallows re-using an existing computer account. In a scenario when you deploy a pre-created RODC, you’ll get the following error.
The solution is to update the domain controller GPO to allow your delegated admin user or group to re-use an existing computer account. Here’s how.
- On the domain controller, open the Group Policy Management console.
gpmc.msc
- Navigate to an existing GPO or create a new one. In this example, let’s create a new GPO.
- Next, type the name of the new GPO and click OK. This example uses the GPO name “Allow Pre-Created RODC Computer Name Re-Use.”
- Right-click the new GPO and click Edit.
- Navigate to Computer ConfigurationSettingsSettingsPoliciesOptions, and double-click the “Domain controller: Allow computer account re-use during domain join” policy.
- Check the “Define this policy” box, click Edit Security, and add the delegated user or group.
The policy is now defined. This means that the delegate user or group members are allowed to join existing computer accounts to the domain, such as the pre-created RODC.
- Wait for the group policy update interval, or run gpupdate /force on the domain controllers.
- Run the gpresult /r command on the domain controller and confirm that the policy has been applied.
Using the Server Manager (GUI)
In this example, we’ll install the read-only domain controller on a server named RODC3 using the Server Manager GUI.
Stage 1: Pre-Create the RODC Account
- Open the “Active Directory Users and Computers” console using your Domain Admin account.
- Right click the “Domain Controllers” container and click the “Pre-create Read-only Domain Controller account” item.
- Check the “Use advanced mode installation” box and click Next.
- On the “Network Credentials” step, specify whether to use the current logged-on credentials or set alternate credentials for whom will install the ADDS role on the RODC. Let’s choose the “My current logged on credentials” option, assuming it is a domain admin.
- Type the target RODC computer name and click Next. In this example, the server name is RODC3.
- Select the AD Site for the new RODC and click Next.
- In this example, the wizard calculated that the DNS server must be installed on the new server and make it a Global catalog. Leave the additional domain controller options as-is and click Next.
- In this step, you can customize the password replication policy ACL. You can add or remove the users or groups whose passwords can be replicated to the new RODC.
The BUILTIN and “Denied RODC Password Replication Group” groups are blocked by default. While only the “AllowedRODC Password Replication Group” is allowed.
Let’s leave the password replication policy ACL as-is in this example and click Next. - In the “Delegation of RODC Installation and Administration”, set the user or group who will be delegated to install the RODC installation. In this example, I’m setting the “THEITBROSDelegated Admins” group I created previously.
- Review the RODC installation options and click Next.
- Lastly, click Finish.
- Check back in the ADUC, and confirm that the new RODC has been added and is disabled.
Stage 2: Install the Read Only Domain Controller
In this stage, the delegated admin account can continue installing the ADDS role and promote the server as an RODC.
- Log in to the target RODC server using a local account (because it is not yet joined to the domain).
- Open PowerShell or CMD as an administrator and run the following command. This command ensures that the domain-join part of the RODC deployment succeeds.
reg add HKLM\System\CurrentControlSet\Control\Lsa /v NetJoinLegacyAccountReuse /t REG_DWORD /d 1 /f
- Open the Server Manager, click Manage → Add Roles and Features.
- Select the “Role-based or feature-based installation” option, and click Next.
- Select the target RODC server and click Next.
- Check the “Active Directory Domain Services” role, click Add Features and Next.
- Click Next on the following pages until you reach the Confirmation step.
- Click Install and wait for the ADDS role installation to complete.
- Once the ADDS installation is finished, click the “Promote this server to a domain controller” link.
- Select the “Add a domain controller to an existing domain” option and type the domain name. Click the Change button and enter the credentials of your delegated administrator.
In this example, the delegated administrator is djohnson, a member of the “RODC Delegated Admins” group. - On the next page, you’ll see a banner saying, “A pre-created RODC account that matches the name of the target server exists in the directory.” This message means that the wizard detected the pre-created RODC computer account.
Select the “Use existing RODC account” option, type the DSRM password, and click Next. - Choose whether to replicate from a specific domain controller or any domain controller and click Next.
- Customize or leave the default database, log files, and SYSVOL paths and click Next.
- Review the RODC installation options and click Next.
- When the prerequisites check has been completed and passed, click Install.
- Wait for the installation to complete. Once the installation is finished, the server will reboot automatically.
- Open the Active Directory Users and Computers console, navigate to the Domain Controllers container, and see that the new RODC is now enabled.
- Remove the NetJoinLegacyAccountReuse registry entry you added in Step 2:
reg delete HKLM\System\CurrentControlSet\Control\Lsa /v NetJoinLegacyAccountReuse /f
Using PowerShell
In this example, we’ll install the read-only domain controller on a server named RODC4 using PowerShell.
Stage 1: Pre-Create the RODC Account
- Log in to the existing RWDC and open PowerShell as admin.
- Run the following command to pre-create the RODC account. In this example, the RODC computer name is RODC4 in the theitbros.com domain. The delegated admin group is ‘THEITBROS\RODC Delegated Admins’, and the AD site is ‘BRANCH-01’.
Add-ADDSReadOnlyDomainControllerAccount `

-DomainControllerAccountName 'RODC4' `

-DomainName theitbros.com `

-DelegatedAdministratorAccountName 'THEITBROS\RODC Delegated Admins' `

-SiteName 'BRANCH-01' - Confirm the new RODC computer account has been created by running this command.
Get-ADDomainController -Filter {Name -eq 'RODC4'} | `

Format-List Hostname,Enabled,Site,IsReadOnly,IsGlobalCatalog
As you can see, the new computer account is read-only and in a disabled state.
Stage 2: Install the Read Only Domain Controller
In this stage, the delegated admin account can continue installing the ADDS role and promote the server as an RODC.
- Log in to the target RODC server using a local account (because it is not yet joined to the domain).
- Open PowerShell as an administrator. Run the following command to install the AD DS role.
Import-Module ServerManager

Install-WindowsFeature AD-Domain-Services -IncludeManagementTools - Run the following command. This command adds the NetJoinLegacyAccountReuse registry entry, ensuring that the RODC deployment’s domain-join part succeeds.
reg add HKLM\System\CurrentControlSet\Control\Lsa /v NetJoinLegacyAccountReuse /t REG_DWORD /d 1 /f
- Run the following commands to save the delegated administrator credentials and the DSRM password.
$DelegatedAdminCredential = Get-Credential -Message 'Enter the delegated administrator credential'

$DSRMPassword = Read-Host -AsSecureString -Prompt 'Enter the DSRM Password' - Next, run the below command to promote the computer and install the RODC.
Import-Module ADDSDeployment

Install-ADDSDomainController `

-Credential $DelegatedAdminCredential `

-SafeModeAdministratorPassword $DSRMPassword `

-CriticalReplicationOnly:$false `

-DatabasePath "C:\Windows\NTDS" `

-DomainName "theitbros.com" `

-LogPath "C:\Windows\NTDS" `

-SysvolPath "C:\Windows\SYSVOL" `

-UseExistingAccount:$true `

-NoRebootOnCompletion:$false `

-Force:$true - Wait for the RODC deployment to finish, and the computer will reboot automatically.
- Once restarted, run the following command in PowerShell to list all RODCs.
Get-ADDomainController -Filter {IsReadOnly -eq $true} | Format-List Hostname,Enabled,Site,IsReadOnly,IsGlobalCatalogConfirm that the new RODC is on the list.
- Remove the NetJoinLegacyAccountReuse registry entry you added in Step 3.
reg delete HKLM\System\CurrentControlSet\Control\Lsa /v NetJoinLegacyAccountReuse /f
Conclusion
This blog post showed you the different ways to install a read-only domain controller (RODC). We’ve used the Server Manager (GUI) and PowerShell to perform the direct and pre-staged RODC installation.
We’ve also touched upon the updated hardening policies that may affect the pre-staged RODC deployment and how to prepare for them, ensuring a successful deployment.



 Once the installation is finished, the RODC server will restart automatically.


 The policy is now defined. This means that the delegate user or group members are allowed to join existing computer accounts to the domain, such as the pre-created RODC.


1 comment
Hi,
can I proceed with this RODC process without adding a delegated administrator account initially over GUI? The reason why I ask is because I get an error when I want to choose the precrated RODC account like I have for other RODC’s… The error is: “The program cannot open the required dialog box because it cannot determine wether the computer named XY.domain.com is joined to a domain. Close the message and try again” – this XY.domain.com is a DC and it is joined to a domain of course… :)
Thanks