If you are looking to set up a secure and efficient FTP server on Ubuntu 22.04, VSFTPD (Very Secure FTP Daemon) is a popular choice. It is lightweight, easy to configure, and offers a range of security features. This blog post will guide you through installing and configuring VSFTPD on Ubuntu 22.04.
Table of Contents
Prerequisites
- Ubuntu Server 22.04 is to be used as the FTP server.
- A computer to be used as an FTP client.
- A user account with root or sudo privileges.
Installing the VSFTPD Ubuntu Server
The VSFTPD package is available in the default Ubuntu repositories, which means you can install it using APT.
But before that, update the package list on your Ubuntu system by running the following command.
sudo apt update
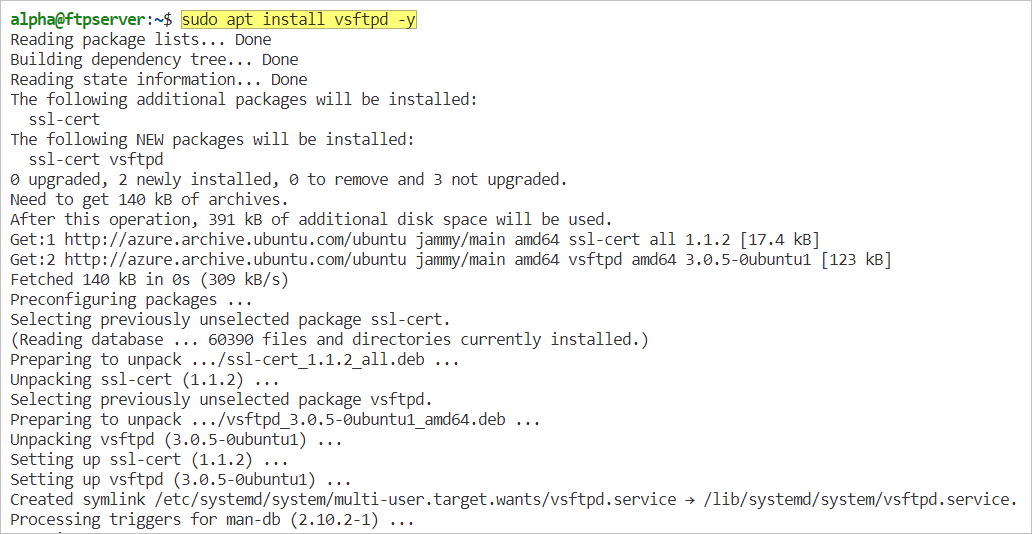
Once the package list is updated, you can install VSFTPD using the following command.
sudo apt install vsftpd -y
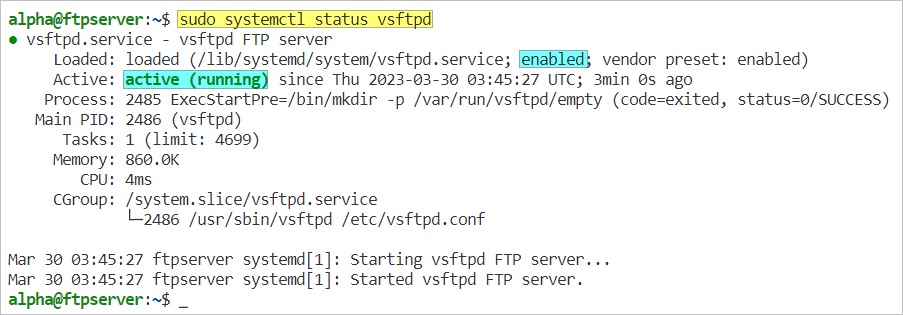
Once installed, check whether the vsftpd service is running.
sudo systemctl status vsftpd
Optionally, check the vsftpd version.
vsftpd -v
The latest version as of this writing is 3.0.5.
Basic VSFTPD Configuration
After installing VSFTPD, you need to configure it to suit your requirements. The VSFTPD configuration file is located at /etc/vsftpd.conf. To edit this file, run the following command:
sudo nano /etc/vsftpd.conf
Disable Anonymous Access
anonymous_enable: This setting determines whether anonymous users are allowed to connect to your FTP server. To disallow anonymous user access, set this to NO.
Allow Local Users
local_enable: This setting determines whether local users (users on your Ubuntu system) are allowed to connect to your FTP server. By default, this is set to YES. If you want to restrict access to a specific group of users, configure the userlist_file and userlist_deny directives.
Enable File Upload
write_enable: This setting determines whether users are allowed to upload files to your FTP server. Set this value to YES.
Enforce “chroot jail”
chroot_local_user: This setting determines whether local users are jailed to their home directory when they connect to your FTP server. By default, this is set to NO, which means that users can navigate to any directory on your system. Set this value to YES to jail users to their home directory,
Enable Home Directory Write Access
allow_writeable_chroot: This setting works hand in hand with the chroot_local_user directive. If set to YES, this gives users write permissions to their home directory when chroot_local_user=YES.
Specify Allow and Deny User Access
When the local_enable directive is enabled, every user on the system, such as those in /etc/passwd, can log in to the FTP server. You can set up the following directives to control which users can access the FTP server.
- userlist_file: This setting specifies the path to a file containing a list of users allowed to connect to your FTP server. By default, the file path is set to /etc/vsftpd.user_list. You can create this file and add the usernames of the users you want to allow.
- userlist_deny: This setting specifies the path to a file containing a list of users who are not allowed to connect to your FTP server. The file path is set to /etc/vsftpd.user by default.
Note. The userlist_file and userlist_deny directives do not exist in the /etc/vsftpd.conf file by default. You must create them first to configure them.
Enable Passive Mode
VSFTPD uses FTP active mode by default, which might cause connection problems when FTP clients use passive mode instead. To enable the FTP passive mode, add the following directives.
- pasv_enable: This setting specifies passive mode is enabled. To enable the FTP passive mode, add this directive and set the value to YES.
- pasv_min_port: Specifies the lowest random port number for FTP passive connections.
- pasv_max_port: Specifies the highest random port number for FTP passive connections.
Restart the VSFTPD Server
Once you’ve completed editing the VSFTPD configuration, save the file and exit the editor. Restart the VSFTPD server for the change to take effect.
sudo systemctl restart vsftpd
Add Firewall Exclusions
If your system has a firewall running, like UFW, you must add exemptions to allow the VSFTPD port numbers. In the terminal, run these commands.
- Port numbers 20 and 21 are the default FTP port numbers.
- Port numbers 2000:2500 is the range of port numbers you specified in the pasv_min_port and pasv_max_port directives
sudo ufw allow 20/tcp
sudo ufw allow 21/tcp
sudo ufw allow 2000:2500/tcp
Confirm the firewall rules by running this command.
Connect to the VSFTPD Server
Now, let’s test if the VSFTPD FTP works. You may use any FTP client for this step. The examples in this section will use WinSCP.
- Open WinSCP and open a new session.
- Choose FTP as the protocol.
- Enter the VSFTPD server hostname, FQDN, or IP address.
- Set the port number value to 21.
- Enter your FTP username and password.
- Click Login.
- Once logged in, upload files from your local computer to the VSFTPD server.
- Wait for the file upload to complete.
Secure FTP Connection with SSL Certificate
At this point, FTP connections between the client and the VSFTPD server are not encrypted, which is a security risk, especially if you’re accessing the FTP server over the internet.
You can secure or encrypt the FTP connections using an SSL certificate. You can get an SSL certificate by:
- Buy a paid SSL certificate from third-party issuers like DigiCert.
- Request a free one from Let’s Encrypt (which expires every 90 days) using an ACME client.
- Generate a self-signed certificate for free.
In this example, we’ll choose the last option.
Generate a Self-Signed Certificate
This command generates a self-signed SSL certificate valid for 365 days and saves the private key and certificate to /etc/ssl/private/vsftpd-key.pem and /etc/ssl/certs/vsftpd-cert.pem.
Note that you will be prompted to enter some information, such as the country, state/province, and common name. You can enter whatever values you like or leave them blank.
sudo openssl req \
-x509 -nodes -days 365 \
-newkey rsa:2048 \
-keyout /etc/ssl/private/vsftpd-key.pem \
-out /etc/ssl/certs/vsftpd-cert.pem
Enable SSL Encryption
Once you have the SSL certificate and private key, open the /etc/vsftpd.conf file in a text editor and update the following directives.
- rsa_cert_file: Specify the certificate file path.
- rsa_private_key_file: Specify the private key file path.
- ssl_enable: Set the value to YES to enable SSL encryption.
After editing, close the VSFTPD configuration file and restart the VSFTPD server.
sudo systemctl restart vsftpd
Now, let’s reconnect to the FTP server. But this time, select the TLS/SSL Explicit Encryption.
The connection status says, “TLS connection established.”
Once connected, you can see the lock icon is enabled, which indicates that the FTP connection is encrypted.
Conclusion
Congratulations! You’ve completed the VSFTPD installation and configuration. Did you like how quick and easy it is to stand up a working and secured FTP server with VSFTPD?
What’s next? You should try to limit the list of users who can access the FTP server by configuring the userlist_file and userlist_deny directives. Also, experiment with creating virtual FTP users instead of local ones for more isolated and secured VSFTPD server access.
Thank you for reading!


