Multi-factor authentication (MFA) in Microsoft 365 is an authentication method that requires more than one factor to be used to authenticate a user. MFA provides additional security when performing user authentication. In today’s risk landscape, where accounts can be easily compromised, MFA provides an excellent layer(s) of account identity protection.
But, there are some scenarios where an MFA-enabled account is not suitable. In those situations, administrators must disable MFA on those accounts. Some of these include but are not limited to:
- Legacy apps that don’t support modern authentication or use of APIs.
- Apps and services using a low-risk service account with the least privileges assigned.
- Users who cannot use smart devices for MFA purposes. Some establishments do not allow bringing in other electronic or smart devices on their premises, which makes MFA impossible to use.
- When troubleshooting issues where MFA may need to be disabled temporarily.
Whatever the reason, know that disabling MFA is possible. The method varies depending on your tenant’s existing MFA setup and policies. This article will demonstrate ways to disable MFA in Microsoft 365.
Table of Contents
Disable Azure AD Security Defaults
Security Defaults is a set of security settings enabled by default for your Microsoft 365 tenant and all user accounts. It includes a setting that requires administrators and users to register and use Multi-Factor Authentication.
If your tenant was created after October 2019, the security defaults were automatically enabled during provisioning.
If the Security Defaults configuration is enabled, you cannot disable MFA for anyone. Here’s how to disable it.
- Log in to Microsoft Entra admin center.
- Navigate to Identity → Overview → Properties.
- Scroll to the bottom and click the “Manage security defaults” link.
- On the fly-out page, select Disabled, choose a Reason for disabling the Security Defaults, and click Save.
- When prompted, click “Disable” to confirm.
The status has changed to “Your organization is not protected by security defaults.”
Per-User MFA
Before introducing Security Defaults and Conditional Access, the MFA was implemented at a per-user configuration. Here are ways to disable the per-user MFA.
Disable using the Per-User MFA Portal
- While in the Microsoft Entra admin center, click Users → All users → Per-user MFA.
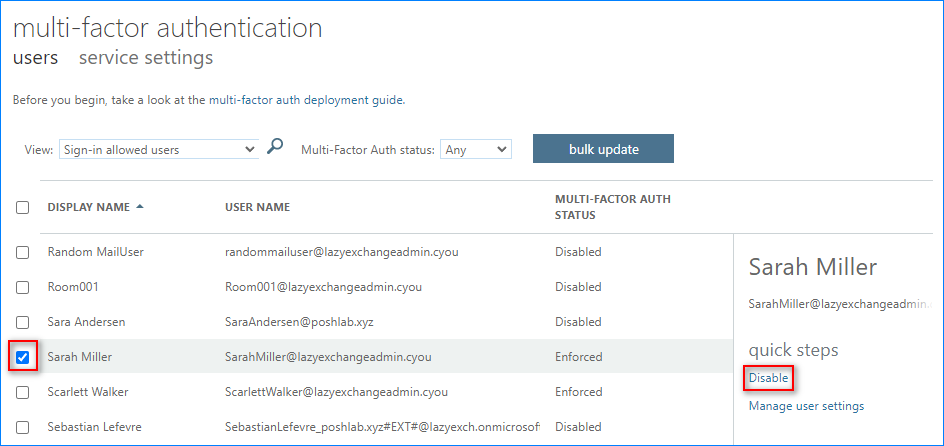
- A new page shows up showing the MFA state per user. Select one or more users whose status is “Enabled” or “Enforced” and click the “Disable” link.
- Click Yes on the confirmation prompt.
- Click Close after the MFA status update is finished.
- Repeat the same steps to disable MFA for other users as needed.
Disable by Adding Trusted IP Address Subnets
Another method is to add trusted IPs to the MFA service settings. Users who sign in from these trusted IP address subnets can bypass MFA.
- Click service settings.
- Under “trusted ips”, check the “Skip multi-factor authentication for requests from federated users on my intranet” box.
- Enter each trusted IP address subnet (CIDR) in the box — one entry per line.
- Scroll to the bottom and click save.
- Click Close once the settings update is finished.
Disable using the MSOnline PowerShell
When disabling per-user MFA in bulk, using the web interface is inefficient. Which is why it is a good thing that PowerShell is an option.
- This method requires Windows PowerShell, the MSOnline module installed. If not installed yet, open Windows PowerShell and install this module.
Note: The MSOnline module is not fully compatible with PowerShell Core. Use Windows PowerShell only.
Install-Module MSOnline
- Once installed, connect to Azure AD PowerShell by running this command:
Connect-MsolService
- The previous command initiates the authentication to Azure AD. Enter your credentials when asked.
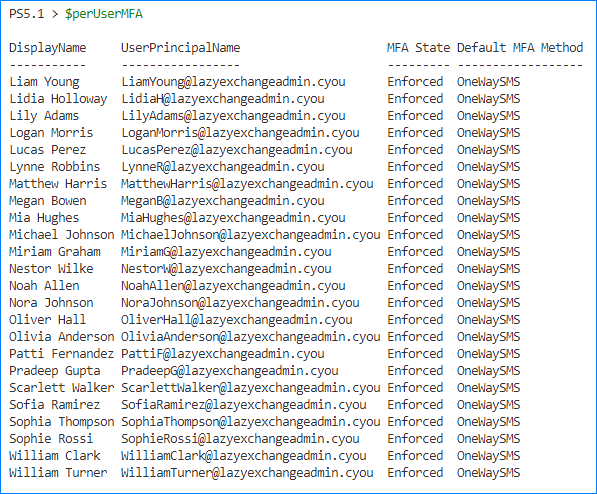
- Once authenticated, you can run the below command to list users with MFA enabled.
Related. Viewing Microsoft 365 User Account Details Using Get-MsolUser.
# Get users with Per-User MFA enabled $perUserMFA = Get-MsolUser -All | Where-Object { $_.UserType -eq 'Member' -and $_.StrongAuthenticationRequirements.State } | Select-Object DisplayName, UserPrincipalName, @{N = "MFA State"; E = { $_.StrongAuthenticationRequirements.State } }, @{N = "Default MFA Method"; E = { if ($mfaType = ($_.StrongAuthenticationMethods | Where-Object { $_.IsDefault }).MethodType) { $mfaType } else { 'None' } } } | Sort-Object DisplayName # Show the results $perUserMFA - The command to execute is below to disable the MFA for individual users. Replace user@domain.tld with the user’s user principal name.
Set-MsolUser -UserPrincipalName user@domain.tld -StrongAuthenticationRequirements @()
For example, this command disables the per-user MFA status for LiamYoung@lazyexchangeadmin.cyou.
Set-MsolUser -UserPrincipalName LiamYoung@lazyexchangeadmin.cyou -StrongAuthenticationRequirements @()
There is no output if the command is successful.
- To disable the per-user MFA status of all users, run this command:
Get-MsolUser -All | Set-MsolUser -StrongAuthenticationRequirements @()
Like the command in the previous step, there is no output if the command is successful.
Conditional Access Policy
The previous methods we discussed to disable MFA are also the prerequisites to implementing MFA via a Conditional Access Policy.
Related. How to Set Up Conditional Access in Azure AD (Office 365)?
If your tenant has an Azure AD Premium Plan 1 or 2 license, you can create conditional access policies that include rules for MFA usage (required or exempted.)
This method lets you disable the MFA requirement for specific groups of users while enforcing MFA for everyone else.
Create the MFA Exclusion Group
First, let’s create a group called the MFA Exclusion Group. The members of this group are intended to skip the MFA requirement when accessing Microsoft 365 resources.
- Click Identity → Groups → All groups → New Group.
- Enter the new group details, including the group type, name, and membership type.
- Specify the group owner and members. You can add more members later.
- Click Create.
Add a New Policy
In this example, we’ll deploy a conditional access policy that requires all users to use MFA.
- While in the Microsoft Entra admin center, navigate to Identity → Protection → Conditional Access.
- Under Conditional Access, click Policies → New policy from template.
- Select the “Require multifactor authentication for all users” template and click the “Review + create” button.
- Ensure the “Policy state” is set to “Report only.” Doing so ensures that the policy is created but not enforced for now. Click Create.
Add an Exclusion
Now, let’s add an exclusion to the policy.
- Click the new policy to open it.
- Click Users → Exclude → Select excluded users and groups. As you can see, the user account that created the policy is automatically excluded from the policy.
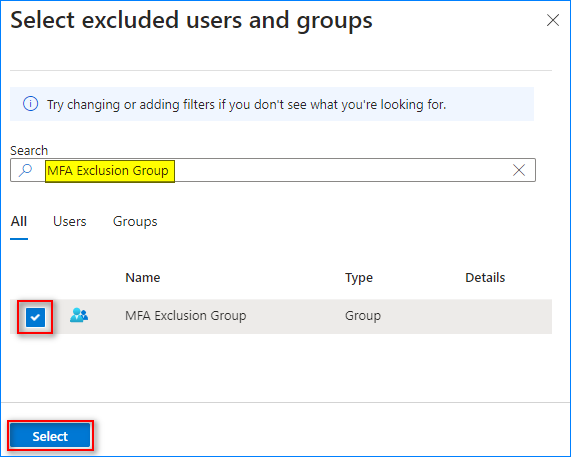
- Find the MFA Exclusion Group, select it, and click Select. You can also add other users and groups here if needed.
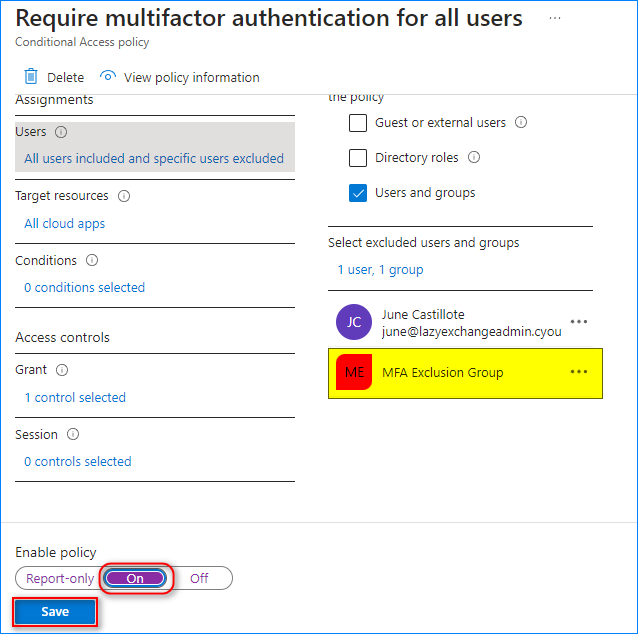
- Once you’ve added all exclusions, enable the policy by selecting “On” and clicking Save.
The policy is now updated with the MFA exclusion, and the status has been turned on.
Conclusion
Disabling MFA in Microsoft 365 accounts must be carefully planned and executed to avoid interruptions. If you decide to disable MFA, you must take extra steps to mitigate potential risks, including educating users and setting up other security measures.
This post showed you how to disable MFA in your Office 365 organization. While the per-user MFA configuration still exists, it is recommended to implement MFA-related settings using Conditional Access Policies whenever possible.


 The status has changed to “Your organization is not protected by security defaults.”


 The policy is now updated with the MFA exclusion, and the status has been turned on.
2 comments
Where is trusted IPs.
What “Service Settings” tab.
Please explain path to configurations better.
I want to disable the authentication app for all users on my website. I am the owner (and only employee) of the company, and I did NOT set up the email system with authentication required. So Microsoft is lying. Using your technique, I need to use the authentication app in order to turn off the authentication app. I cannot use this method if my phone does not have the app.